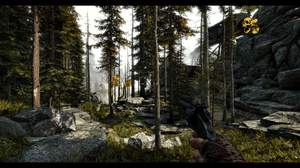
/*-----------------------------------------------------------.
/ Choose effects /
'-----------------------------------------------------------*/
#define USE_SMAA_ANTIALIASING 1
#define USE_CARTOON 1
#define USE_LUMASHARPEN 1
#define USE_LIFTGAMMAGAIN 1
#define USE_TONEMAP 1
#define USE_VIBRANCE 1
#define USE_CURVES 1
#define USE_SEPIA 1
#define USE_DITHER 1
#define USE_FILMGRAIN 0
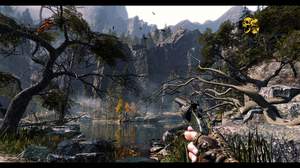
/*-----------------------------------------------------------.
/ SMAA Anti-aliasing settings /
'-----------------------------------------------------------*/
#define SMAA_THRESHOLD 0.05 //[0.05 to 0.20] Edge detection threshold. If SMAA misses some edges try lowering this slightly. I prefer between 0.08 and 0.12.
#define SMAA_MAX_SEARCH_STEPS 32 //[0 to 98] Determines the radius SMAA will search for aliased edges
#define SMAA_MAX_SEARCH_STEPS_DIAG 16 //[0 to 16] Determines the radius SMAA will search for diagonal aliased edges
#define SMAA_CORNER_ROUNDING 25 //[0 to 100] Determines the percent of antialiasing to apply to corners. 0 seems to affect fine text the least so it's the default.
// -- Advanced SMAA settings --
#define COLOR_EDGE_DETECTION 1 //[0 or 1] 1 Enables color edge detection (slower but slightly more acurate) - 0 uses luma edge detection (faster)
#define SMAA_DIRECTX9_LINEAR_BLEND 0 //[0 or 1] Using DX9 HARDWARE? (software version doesn't matter) if so this needs to be 1 - If not, leave it at 0.
//Enable this only if you use a Geforce 7xxx series or older card, or a Radeon X1xxx series or older card.
/*-----------------------------------------------------------.
/ Cartoon settings /
'-----------------------------------------------------------*/
#define CartoonPower 0.18 //[0.1 to 10.0] Amount of effect you want.
/*-----------------------------------------------------------.
/ LumaSharpen settings /
'-----------------------------------------------------------*/
// -- Sharpening --
#define sharp_strength 1.25 //[0.10 to 3.00] Strength of the sharpening
#define sharp_clamp 0.045 //[0.000 to 1.000] Limits maximum amount of sharpening a pixel recieves - Default is 0.035
// -- Advanced sharpening settings --
#define pattern 2 //[1|2|3|4] Choose a sample pattern. 1 = Fast, 2 = Normal, 3 = Wider, 4 = Pyramid shaped.
#define offset_bias 1.0 //[0.0 to 6.0] Offset bias adjusts the radius of the sampling pattern.
//I designed the pattern for offset_bias 1.0, but feel free to experiment.
// -- Debug sharpening settings --
#define show_sharpen 0 //[0 or 1] Visualize the strength of the sharpen (multiplied by 4 to see it better)
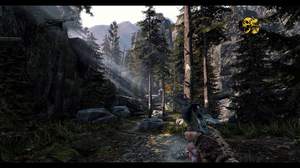
/*-----------------------------------------------------------.
/ Lift Gamma Gain settings /
'-----------------------------------------------------------*/
#define RGB_Lift float3(0.940, 0.940, 0.940) //[0.000 to 2.000] Adjust shadows for Red, Green and Blue
#define RGB_Gamma float3(1.010, 1.010, 1.010) //[0.000 to 2.000] Adjust midtones for Red, Green and Blue
#define RGB_Gain float3(1.005, 1.005, 1.010) //[0.000 to 2.000] Adjust highlights for Red, Green and Blue
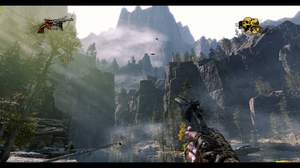
/*-----------------------------------------------------------.
/ Tonemap settings /
'-----------------------------------------------------------*/
#define Gamma 1.0 //[0.000 to 2.000] Adjust midtones
#define Exposure -0.03 //[-1.000 to 1.000] Adjust exposure
#define Saturation 0.00 //[-1.000 to 1.000] Adjust saturation
#define Bleach 0.00 //[0.000 to 1.000] Brightens the shadows and fades the colors
#define Defog 0.001 //[0.000 to 1.000] How much of the color tint to remove
#define FogColor float3(1.40, 1.10, 0.90) //[0.00 to 2.55, 0.00 to 2.55, 0.00 to 2.55] What color to remove - default is blue
/*-----------------------------------------------------------.
/ Vibrance settings /
'-----------------------------------------------------------*/
#define Vibrance -0.07 //[-1.00 to 1.00] Intelligently saturates (or desaturates if you use negative values) the pixels depending on their original saturation.
/*-----------------------------------------------------------.
/ Curves settings /
'-----------------------------------------------------------*/
#define Curves_mode 2 //[0|1|2] Choose what to apply contrast to. 0 = Luma, 1 = Chroma, 2 = both Luma and Chroma. Default is 0 (Luma)
#define Curves_contrast 0.25 //[-1.00 to 1.00] The amount of contrast you want
// -- Advanced curve settings --
#define Curves_formula 7 //[1|2|3|4|5|6|7|8|9] The contrast s-curve you want to use.
//1 = Sine, 2 = Abs split, 3 = Smoothstep, 4 = Exp formula, 5 = Simplified Catmull-Rom (0,0,1,1), 6 = Perlins Smootherstep
//7 = Abs add, 8 = Techicolor Cinestyle, 9 = Parabola.
//Note that Technicolor Cinestyle is practically identical to Sine, but runs slower. In fact I think the difference might only be due to rounding errors.
//I prefer 2 myself, but 3 is a nice alternative with a little more effect (but harsher on the highlight and shadows) and it's the fastest formula.
/*-----------------------------------------------------------.
/ Sepia settings /
'-----------------------------------------------------------*/
#define ColorTone float3(1.40, 1.10, 0.90) //[0.00 to 2.55, 0.00 to 2.55, 0.00 to 2.55] What color to tint the image
#define GreyPower 0.12 //[0.00 to 1.00] How much desaturate the image before tinting it
#define SepiaPower 0.08 //[0.00 to 1.00] How much to tint the image
/*-----------------------------------------------------------.
/ Dither settings /
'-----------------------------------------------------------*/
#define dither_method 1 //[1 or 2] 1 = Ordering dithering (good and very fast), 2 = Random dithering (even better dithering but not as fast)
//Note that the patterns used by Dither, makes an image harder to compress.
//This can make your screenshots and video recordings take up more space.
/*-----------------------------------------------------------.
/ Film grain settings /
'-----------------------------------------------------------*/
#define FilmGrainIntensity 0.80 //[0.00 to 1.00] Intensity of grain. Default is 0.46
#define FilmGrainExposure 40 //[0 to 100] Grain Exposure. Default is 40 (Lower -> darker noise)
#define FilmGrainSize 4 //[0 to 10] Size of the grain. Default is 2 (Higher -> thinner noise)
/*-----------------------------------------------------------.
/ Key settings /
'-----------------------------------------------------------*/
// This is the section where you can define your own key mapping
// See the following URL to find out what keycode a key has:
// http://www.cambiaresearch.com/articles/15/javascript-char-codes-key-codes
// key_toggle_sweetfx = 46
// key_reload_sweetfx = 45