Summary
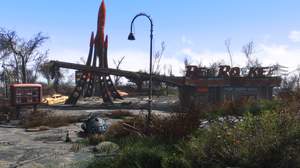
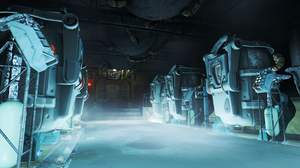
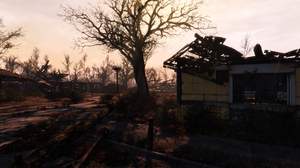
Fallout 4 is already a beautiful game, I was looking to make the game more moody and vibrant, but not too over the top. I focused on some of the effects I enjoy most such as Chromatic Aberration, while trying to not be as performance taxing as an ENB for smooth 4k play. I hope you enjoy!
This Reshade was tested at 4K resolution with Vivid Weathers and Enhanced Lighting and FX. Checkout Nexus Mods to pick them up!
Important Note
Please note that I select shaders and their settings based on each
individual game I create a Reshade for. This takes time, and I hope my efforts show. It seems common for many creators to reuse the same Reshade across games regardless of art style, mood or setting.
Please feel free to take a moment to checkout my other Reshades if you have a moment!
https://sfx.thelazy.net/users/u/iChillum/
Required Shaders
Note that the instructions provide guidance on downloading these shaders. Downloading only the necessary shaders will help guarantee additional game performance.
-ChromaticAberration
-ColorMatrix
-Curves
-FakeHDR
-LumaSharpen
-Vibrance
Installation
1. Download the ReShade installer from
https://reshade.me and run it.
2.Select Fallout4.exe (\%SteamDirectory%\steamapps\common\Fallout 4) and click on the graphics API DirectX 10+ (This was tested with DirectX 11).
3.Confirm the installation of standard shaders when the installer's pop-up message opens, and install the following shaders: CA,ColorMatrix,Curves,HDR,LumaSharpen,Vibrance
4.Download this preset by hitting the button below, and rename the file to "YOUR_PRESET_NAME.ini". The most important part is changing the ".txt" file to ."ini."
5.Run Fallout 4; be patient as the game can take longer to load all of the ReShade shaders.
6.Open ReShade menu with "Shift+F2" and use the drop down menu to select the .ini file you just put in your bin folder. Keep hitting the continue button until the boxes turn from red to grey/clear.
7.If you are happy with the settings, Click on the Settings tab.
8.Navigate to Usage Mode and change to Performance. This will ensure the best possible performance for low-end systems while running ReShade
Notes and Known Issues
~ Not so much an issue, but just something to be aware of. As in the description I wanted to make the preset more "moody", and as a result shadows are more dramatic, and things are just darker with HDR effects. For me this creates more immersion and makes me actually use the pip-boy flashlight. I did pay special attention during configuration to make night not
too dark though. I would also recommend checking out flashlight mods on the Nexus.
Performance
While I design and test all of my Reshades with performance in-mind, my hardware settings and resolutions may differ from yours. While mood is important, framerate should be the most important if you are a true gamer. Nothing will be "one size fits all", so play around and find the right compromise of performance and quality.
My PC Hardware: https://pcpartpicker.com/user/iChillum/saved/#view=dkYLD3
~ CPU is overclocked to 4.8GHz Turbo speed, and CPU cores are unparked.
Release Notes
1.1 - Jul. 7, 2018
Slightly lowered Vibrance values from v1.0 as things were sometimes
too bright. Changes were tested with ReShade 3.4.0.346.
1.0 - Nov. 23, 2017
Initial release


Nice