/************************************************************/
/ Description /
/**********************************************************/
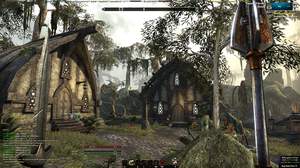
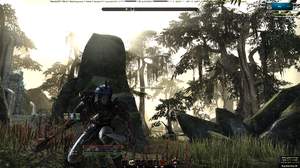
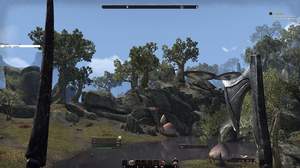
Game: TESO ? The Elder Scroll Online
Author: nFiXx ? Ascendance Guild
Description :
Best render quality using :
- SMAA ULTRA (0.05 / 64 / 16 / 20) // You can adjust it if you lost too many fps, here are settings for ultra / medium / low :
ultra : 0.05 / 64 / 16 / 20
medium : 0.10 / 8 / 0 / 100
low : 0.15 / 4 / 0 / 100
- BLOOM OPTIMIZATION
- HDR
- LUMASHARPEN
- LIFTGAMMAGAIN
- TONEMAP
- VIBRANCE
- CURVES
- DITHER
/************************************************************/
/ Choose effects /
/************************************************************/
// Set to 1 for ON or 0 for OFF
#define USE_SMAA_ANTIALIASING 1 //[0 or 1] SMAA Anti-aliasing : Smoothens jagged lines using the SMAA technique.
#define USE_FXAA_ANTIALIASING 0 //[0 or 1] FXAA Anti-aliasing : Smoothens jagged lines using the FXAA technique. WIP - Currently only works in DX9 and you need to use the FXAA injector dlls.
#define USE_CARTOON 0 //[0 or 1] Cartoon : "Toon"s the image. (Interferes with SMAA, CRT, Bloom, HDR and Lumasharpen)
#define USE_ADVANCED_CRT 0 //[0 or 1] Advanced CRT : Simulates an old CRT TV display. (Interferes with SMAA, Cartoon, Bloom, HDR and Lumasharpen, and it has a very high performance cost)
#define USE_BLOOM 1 //[0 or 1] Bloom : Makes bright lights bleed their light into their surroundings (relatively high performance cost)
#define USE_HDR 1 //[0 or 1] HDR : Not actual HDR - It just tries to mimic an HDR look (relatively high performance cost)
#define USE_LUMASHARPEN 1 //[0 or 1] LumaSharpen : Also sharpens the antialiased edges which makes them less smooth - I'm working on fixing that.
#define USE_TECHNICOLOR 1 //[0 or 1] TECHNICOLOR : Attempts to mimic the look of an old movie using the Technicolor three-strip color process (Techicolor Process 4)
#define USE_DPX 0 //[0 or 1] Cineon DPX : Should make the image look like it's been converted to DXP Cineon - basically it's another movie-like look similar to technicolor.
#define USE_MONOCHROME 0 //[0 or 1] Monochrome : Monochrome makes the colors disappear.
#define USE_LIFTGAMMAGAIN 1 //[0 or 1] Lift Gamma Gain : Adjust brightness and color of shadows, midtones and highlights (avoids clipping)
#define USE_TONEMAP 1 //[0 or 1] Tonemap : Adjust gamma, exposure, saturation, bleach and defog. (may cause clipping)
#define USE_VIBRANCE 1 //[0 or 1] Vibrance : Intelligently saturates (or desaturates if you use negative values) the pixels depending on their original saturation.
#define USE_CURVES 1 //[0 or 1] Curves : Contrast adjustments using S-curves.
#define USE_SEPIA 0 //[0 or 1] Sepia : Sepia tones the image.
#define USE_VIGNETTE 0 //[0 or 1] Vignette : Darkens the edges of the image to make it look more like it was shot with a camera lens. May cause banding artifacts.
#define USE_DITHER 1 //[0 or 1] Dither : Applies dithering to simulate more colors than your monitor can display. This lessens banding artifacts (mostly caused by Vignette)
#define USE_BORDER 0 //[0 or 1] Border : Makes the screenedge black as a workaround for the bright edge that forcing some AA modes sometimes causes.
#define USE_SPLITSCREEN 0 //[0 or 1] Splitscreen : Enables the before-and-after splitscreen comparison mode.
/************************************************************/
/ SMAA Anti-aliasing settings /
/**********************************************************/
// -- IF U LOST TOO MANY FPS CHECK DESCRIPTION TO ADJUST THE SMAA QUALITY --
#define SMAA_THRESHOLD 0.05 //[0.05 to 0.20]
#define SMAA_MAX_SEARCH_STEPS 64 //[0 to 98]
#define SMAA_MAX_SEARCH_STEPS_DIAG 16 //[0 to 16]
#define SMAA_CORNER_ROUNDING 20 //[0 to 100]
// -- Advanced SMAA settings --
#define COLOR_EDGE_DETECTION 1 //[0 or 1]
#define SMAA_DIRECTX9_LINEAR_BLEND 0 //[0 or 1]
/************************************************************/
/ FXAA Anti-aliasing settings /
/**********************************************************/
#define FXAA_QUALITY__PRESET 9 //[1 to 9] Choose the quality preset. 9 is the highest quality.
#define fxaa_Subpix 0.400 //[0.000 to 1.000] Choose the amount of sub-pixel aliasing removal.
#define fxaa_EdgeThreshold 0.250 //[0.000 to 1.000] Edge detection threshold. The minimum amount of local contrast required to apply algorithm.
#define fxaa_EdgeThresholdMin 0.060 //[0.000 to 1.000] Darkness threshold. Trims the algorithm from processing darks.
/************************************************************/
/ Cartoon settings /
/**********************************************************/
#define CartoonPower 1.0 //[0.1 to 10.0] Amount of effect you want.
/************************************************************/
/ Advanced CRT settings /
/**********************************************************/
#define CRTAmount 1.00 //[0.00 to 1.00] Amount of CRT effect you want
#define CRTResolution 1.2 //[1.0 to 8.O] Input size coefficent (low values gives the "low-res retro look"). Default is 1.2
#define CRTgamma 2.4 //[0.0 to 4.0] Gamma of simulated CRT (default 2.4)
#define CRTmonitorgamma 2.2 //[0.0 to 4.0] Gamma of display monitor (typically 2.2 is correct)
#define CRTBrightness 1.0 //[1.0 to 3.0] Used to boost brightness a little. Default is 1.0
#define CRTScanlineIntensity 2.0 //[2.0 to 4.0] Scanlines intensity (use integer values preferably). Default is 2.0
#define CRTScanlineGaussian 1 //[0 or 1] Use the "new nongaussian scanlines bloom effect". Default is on
#define CRTCurvature 1 //[[0 or 1] "Barrel effect" enabled (1) or off (0)
#define CRTCurvatureRadius 1.5 //[0.0 to 2.0] Curvature Radius (only effective when Curvature is enabled). Default is 1.5
#define CRTCornerSize 0.0010 //[0.0000 to 0.0020] Higher values, more rounded corner. Default is 0.001
#define CRTDistance 2.00 //[0.00 to 4.00] Simulated distance from viewer to monitor. Default is 2.00
#define CRTAngleX 0.00 //[-0.20 to 0.20] Tilt angle in radians (X coordinates)
#define CRTAngleY -0.10 //[-0.20 to 0.20] Tilt angle in radians (Y coordinates). (Value of -0.15 gives the 'arcade tilt' look)
#define CRTOverScan 1.01 //[1.00 to 1.10] Overscan (e.g. 1.02 for 2% overscan). Default is 1.01
#define CRTOversample 0 //[0 or 1] Enable 3x oversampling of the beam profile (warning : performance hit)
/************************************************************/
/ Bloom settings /
/**********************************************************/
#define BloomThreshold 19.02 //[0.00 to 50.00] Threshold for what is a bright light (that causes bloom) and what isn't.
#define BloomPower 0.886 //[0.000 to 8.000] Strength of the bloom
#define BloomWidth 0.0100 //[0.0000 to 1.0000] Width of the bloom
/************************************************************/
/ HDR settings /
/**********************************************************/
#define HDRPower 1.00 //[0.00 to 8.00] Strangely lowering this makes the image brighter
#define radius2 0.81 //[0.00 to 8.00] Raising this seems to make the effect stronger and also brighter
/************************************************************/
/ LumaSharpen settings /
/**********************************************************/
// -- Sharpening --
#define sharp_strength 1.10 //[0.10 to 3.00] Strength of the sharpening
#define sharp_clamp 0.075 //[0.000 to 1.000] Limits maximum amount of sharpening a pixel recieves - Default is 0.035
// -- Advanced sharpening settings --
#define pattern 4 //[1|2|3|4] Choose a sample pattern. 1 = Fast, 2 = Normal, 3 = Wider, 4 = Pyramid shaped.
#define offset_bias 1.0 //[0.0 to 6.0] Offset bias adjusts the radius of the sampling pattern.
//I designed the pattern for offset_bias 1.0, but feel free to experiment.
// -- Debug sharpening settings --
#define show_sharpen 0 //[0 or 1] Visualize the strength of the sharpen (multiplied by 4 to see it better)
/************************************************************/
/ TECHNICOLOR settings /
/**********************************************************/
#define TechniAmount 0.4 //[0.00 to 1.00]
#define TechniPower 4.0 //[0.00 to 8.00]
#define redNegativeAmount 0.88 //[0.00 to 1.00]
#define greenNegativeAmount 0.88 //[0.00 to 1.00]
#define blueNegativeAmount 0.88 //[0.00 to 1.00]
/************************************************************/
/ Cineon DPX settings /
/**********************************************************/
#define Red 8.0 //[1.0 to 15.0]
#define Green 8.0 //[1.0 to 15.0]
#define Blue 8.0 //[1.0 to 15.0]
#define ColorGamma 2.5 //[0.1 to 2.5] Adjusts the colorfulness of the effect in a manner similar to Vibrance. 1.0 is neutral.
#define DPXSaturation 3.0 //[0.0 to 8.0] Adjust saturation of the effect. 1.0 is neutral.
#define RedC 0.36 //[0.60 to 0.20]
#define GreenC 0.36 //[0.60 to 0.20]
#define BlueC 0.34 //[0.60 to 0.20]
#define Blend 0.2 //[0.00 to 1.00] How strong the effect should be.
/************************************************************/
/ Monochrome settings /
/**********************************************************/
#define Monochrome_conversion_values float3(0.18,0.41,0.41) //[0.00 to 1.00] Percentage of RGB to include (should sum up to 1.00)
/************************************************************/
/ Lift Gamma Gain settings /
/**********************************************************/
#define RGB_Lift float3(1.010, 1.010, 1.010) //[0.000 to 2.000] Adjust shadows for Red, Green and Blue
#define RGB_Gamma float3(1.010, 1.010, 1.010) //[0.000 to 2.000] Adjust midtones for Red, Green and Blue
#define RGB_Gain float3(1.010, 1.010, 1.010) //[0.000 to 2.000] Adjust highlights for Red, Green and Blue
/************************************************************/
/ Tonemap settings /
/**********************************************************/
#define Gamma 1.1 //[0.000 to 2.000] Adjust midtones
#define Exposure 0.0 //[-1.000 to 1.000] Adjust exposure
#define Saturation -0.25 //[-1.000 to 1.000] Adjust saturation
#define Bleach 0.02 //[0.000 to 1.000] Brightens the shadows and fades the colors
#define Defog 0.020 //[0.000 to 1.000] How much of the color tint to remove
#define FogColor float3(0.00, 0.00, 2.55) //[0.00 to 2.55, 0.00 to 2.55, 0.00 to 2.55] What color to remove - default is blue
/************************************************************/
/ Vibrance settings /
/**********************************************************/
#define Vibrance -0.05 //[-1.00 to 1.00] Intelligently saturates (or desaturates if you use negative values) the pixels depending on their original saturation.
/************************************************************/
/ Curves settings /
/**********************************************************/
#define Curves_mode 2 //[0|1|2] Choose what to apply contrast to. 0 = Luma, 1 = Chroma, 2 = both Luma and Chroma. Default is 0 (Luma)
#define Curves_contrast 0.15 //[-1.00 to 1.00] The amount of contrast you want
// -- Advanced curve settings --
#define Curves_formula 6 //[1|2|3|4|5|6|7|8|9] The contrast s-curve you want to use.
//1 = Sine, 2 = Abs split, 3 = Smoothstep, 4 = Exp formula, 5 = Simplified Catmull-Rom (0,0,1,1), 6 = Perlins Smootherstep
//7 = Abs add, 8 = Techicolor Cinestyle, 9 = Parabola.
//Note that Technicolor Cinestyle is practically identical to Sine, but runs slower. In fact I think the difference might only be due to rounding errors.
//I prefer 2 myself, but 3 is a nice alternative with a little more effect (but harsher on the highlight and shadows) and it's the fastest formula.
/************************************************************/
/ Sepia settings /
/**********************************************************/
#define ColorTone float3(1.40, 1.10, 0.90) //[0.00 to 2.55, 0.00 to 2.55, 0.00 to 2.55] What color to tint the image
#define GreyPower 0.11 //[0.00 to 1.00] How much desaturate the image before tinting it
#define SepiaPower 0.58 //[0.00 to 1.00] How much to tint the image
/************************************************************/
/ Vignette settings /
/**********************************************************/
#define VignetteRatio 1.00 //[0.15 to 6.00] Sets a width to height ratio. 1.00 (1/1) is perfectly round, while 1.60 (16/10) is 60 % wider than it's high.
#define VignetteRadius 1.00 //[-1.00 to 3.00] lower values = stronger radial effect from center
#define VignetteAmount -1.00 //[-2.00 to 1.00] Strength of black. -2.00 = Max Black, 1.00 = Max White.
#define VignetteSlope 8 //[1 to 16] How far away from the center the change should start to really grow strong (odd numbers cause a larger fps drop than even numbers)
#define VignetteCenter float2(0.500, 0.500) //[0.000 to 1.000, 0.000 to 1.000] Center of effect.
/************************************************************/
/ Dither settings /
/**********************************************************/
#define dither_method 2 //[1 or 2] 1 = Ordering dithering (good and very fast), 2 = Random dithering (even better dithering but not as fast)
//Note that the patterns used by Dither, makes an image harder to compress.
//This can make your screenshots and video recordings take up more space.
/************************************************************/
/ Border settings /
/**********************************************************/
//No settings yet, beyond switching it on or off in the top section.
/************************************************************/
/ Splitscreen settings /
/**********************************************************/
#define splitscreen_mode 1 //[1|2|3|4|5] 1 = Vertical 50/50 split, 2 = Vertical 25/50/25 split, 3 = Vertical 50/50 angled split, 4 = Horizontal 50/50 split, 5 = Horizontal 25/50/25 split


poor guy, stop create account and go troll away =]
Oh so that is why thousands of people on reddit and on TF have already said there is no true fullscreen mode.
Oh so that is why nobody has managed to get MSAA or any kind of AA working apart from the built-in FXAA.
Oh so that is why Nvidia took ESO off their list of SLI supported games.
What you are seeing in ESO is a PLACEBO effect nFiXX. Not in other games, but in ESO it definitely is.
Step off your high horse and stop talking like you know, because your false claims are a laughable exercise.
@Sekta : trolllllllllll / tards
Epic ignorant, u should stop talk :-)it's just ridiculous.
U just saying, drivers overwriting AA solution is a placebo for all games. Just open ure eyes and test.
Test drivers : USE APPLICATION SETTINGS / DEFAUT and OVERWRITE APPLICATION SETTINGS. Just that with MSAA, Edge Detect, Tessel lol.
All D3D engine or textures can be overwrited by forcing drivers.Like Tesselation.
U can apply MSAA if u want. Just have a good gpu to do that.
U overwrite game engine specs, so osef if it's supported or not. It's applied by GPU / DRIVERS not an software engine. It's made by HARDWARE.
So now, stfu and go read a little bit more :)
Crossfire? The game does not support exclusive fullscreen mode. And since when does their game engine support MSAA? Their AA is a post-processing filter like FXAA or SMAA. Everything you are forcing in the drivers is placebo lol.
Eh... SMAA does not have anything to do with Nvidia or AMD... You might want to check http://www.iryoku.com/smaa/ before you make such claims.
SMAA does not work with borderless windowed mode. SMAA does nto work with ESO.
Period.
Sorry but the game does not support "AA" ?? Are u kidding ?
TESO game engine not support AA in natif ? lol ?
CFAAx24EQ as not to be supported by the game, it's OVERWRITED by driver like an overlay. U just remplace the 16xAA classic game engine by this. If u can't understand that..
FXAA is not universal at all. It's NVIDA Directx post-process for theim cards. Not for ATI. Activate it for ATI, it's just a real placebo, ya.
Just us here for Radeon Pro to transmit Sweet FX post-process. Not using at real FXAA. SMAA, is natif for ATI and full support, yes. Once again, u can check before ure sources :)
It's simple :
FXAA = NVIDIA
SMAA = ATI
GAME ENGINE = 16xAA SS & YES u can bypass it by driver AA crossfire solution at 24AAxEQ MM like HBAO.
GAME ENGINE = don't support TESS.64x.
& YES, u can again apply at ANY game or ANY D3D texture a tess.64X by forcing it via DRIVER panel.
Try it on CF solution and u'll see.
Just stop telling shit :) and trolling anothers profiles lol
Sorry but the game does not support AA. The in-game option is just post-processing and forcing it driver level does nothing. I see you even try forcing 64x tesselation which is hilarious as the game doesn't have any tesselation. FXAA is universal and if you can't see any difference with it on or off then something is really wrong. AO has to be turned on in the RadeonPro settings and you need a compatibility profile for ESO to get it to work. Once again you are seeing placebo.
AO profile was forced and created in ati driver panel. So HBAO is working fine. I overwrite all AA, Aniso, AO (but i've got CF 290X for my work, so i can permit).
Beetween AA 16XEQ and 24xEQ + Edge Detect, i so a fucking difference ig :)
But it's eating much much FPS, i'm agreed.
FXAA do nothing alone. Is not supported in DX ATI instructions. It's an NVIDIA features. It's not hardware supported.
In this case here, it's just a tweak for Radeon Pro to past shaders overlay SweetFx like an classic FXAA. It's the way to activate SweetFX + RadeonPro nothing more.
SMAA is the equivalent for ati and it's not destroy text or another gfx ig. This work fine.
HBAO doesn't do anything without an AO profile. SMAA is just going to destroy text and luma sharpen even further. No need when you have to force FXAA. Forcing AA doesn't do anything either.
Hi,
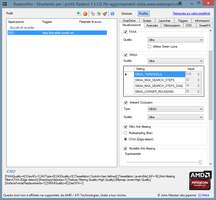
SMAA was not supported by the game in the SweetFx preset file. So u need to active it in the visual tab of Radeon Pro. If u have a good video card u can select "ultra".
To work, u need to activate always in RadeonPro, FXAA (Ultra).
However, FXAA is Nvidia filtering AA solution. SMAA is ATI.
I post a screen of my current settings (R9).
Whats your settings in radeon pro visual and advanced? thanks
Hi and thank you for the great preset!
However, when I enable SMAA in the Visual tab OR in the SweetFX profile, there is still definitely no SMAA ingame. Could this be because it conflicts with FXAA, which must be enabled for SweetFX to work?
How did you manage to run the game with SMAA?
@Sekta +1
Radeonpro doesn't respect any kind of SMAA or FXAA values in the profile. That has to be set in the Visual tab by the way.
U can find 'WAR LEGEND HUD' here :
http://www.curse.com/teso-addons/teso/warlegend-hud