/*-----------------------------------------------------------.
/ Description /
'------------------------------------------------------------/
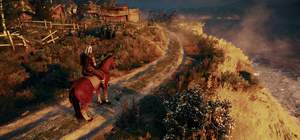
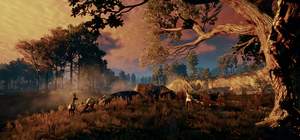
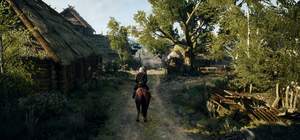
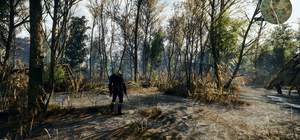
Game: The Witcher 3
Author: RainyNguyen
Preset Verion: v1.3
SweetFX/Injector version: v2.0 Preview 8 by CeeJay.dk / ReShade 0.16.0
Description:
__________ .__ _______
\______ \_____ |__| ____ ___.__.\ \ ____ __ __ ___.__. ____ ____
| _/\__ \ | |/ < | |/ | \ / ___\| | < | |/ __ \ / \
| | \ / __ \| | | \___ / | \/ /_/ > | /\___ \ ___/| | \
|____|_ /(____ /__|___| / ____\____|__ /\___ /|____/ / ____|\___ >___| /
\/ \/ \/\/ \//_____/ \/ \/ \/
/*-----------------------------------------------------------.
/ Choose effects /
'-----------------------------------------------------------*/
// Effects are listed in the order that they are applied.
// Set to 1 for ON or 0 for OFF
#define USE_ASCII 0 //[0 or 1] Ascii : Converts the image to Ascii-art.
#define USE_CARTOON 0 //[0 or 1] Cartoon : "Toon"s the image.
#define USE_SMAA 1 //[0 or 1] SMAA Anti-aliasing : Smoothens jagged lines using the SMAA technique.
#define USE_FXAA 0 //[0 or 1] FXAA Anti-aliasing : Smoothens jagged lines using the FXAA technique.
#define USE_EXPLOSION 0 //[0 or 1] Explosion : Scatters the pixels, making the image look fuzzy.
#define USE_CA 0 //[0 or 1] Chromatic Aberration : Mimics the look of a cheap camera lens, by distorting the colors.
#define USE_ADVANCED_CRT 0 //[0 or 1] Advanced CRT : Simulates an old CRT TV display. (has a very high performance cost)
#define USE_PIXELART_CRT 0 //[0 or 1] PixelArt CRT : Scanlines for pixel art (high performance cost)
#define USE_BLOOM 0 //[0 or 1] Bloom : Makes bright lights bleed their light into their surroundings (relatively high performance cost)
#define USE_HDR 0 //[0 or 1] HDR : Not actual HDR - It just tries to mimic an HDR look (relatively high performance cost)
#define USE_LUMASHARPEN 1 //[0 or 1] LumaSharpen : Sharpens the image.
#define USE_LENS_DISTORTION 0 //[0 or 1] Cubic Lens Distortion : Distorts the lens cubicly. (WIP)
#define USE_NOSTALGIA 0 //[0 or 1] Nostalgia : Remember when you played that game you always played on that first system of yours? You don't? Well here is a reminder.
#define USE_LEVELS 0 //[0 or 1] Levels : Sets a new black and white point. This increases contrast but causes clipping. Use Curves instead if you want to avoid that.
#define USE_TECHNICOLOR 0 //[0 or 1] TECHNICOLOR : Attempts to mimic the look of an old movie using the Technicolor three-strip color process (Techicolor Process 4)
#define USE_TECHNICOLOR2 0 //[0 or 1] TECHNICOLOR 2 : Yet another Technicolor effect - not sure if this stays or not. Let me know if you like it.
#define USE_DPX 1 //[0 or 1] Cineon DPX : Should make the image look like it's been converted to DXP Cineon - basically it's another movie-like look similar to technicolor.
#define USE_MONOCHROME 0 //[0 or 1] Monochrome : Monochrome makes the colors disappear.
#define USE_COLORMATRIX 0 //[0 or 1] Color Matrix : Allows color modification using a user-defined color matrix.
#define USE_LIFTGAMMAGAIN 1 //[0 or 1] Lift Gamma Gain : Adjust brightness and color of shadows, midtones and highlights.
#define USE_TONEMAP 1 //[0 or 1] Tonemap : Adjust gamma, exposure, saturation, bleach and defog. (may cause clipping)
#define USE_VIBRANCE 1 //[0 or 1] Vibrance : Intelligently saturates (or desaturates if you use negative values) the pixels depending on their original saturation.
#define USE_CURVES 1 //[0 or 1] Curves : Contrast adjustments using S-curves.
#define USE_SEPIA 0 //[0 or 1] Sepia : Sepia tones the image.
#define USE_VIGNETTE 0 //[0 or 1] Vignette : Darkens the edges of the image to make it look more like it was shot with a camera lens. May cause banding artifacts.
#define USE_FILMGRAIN 0 //[0 or 1] Film Grain : Adds film grain to the image.
#define USE_DITHER 0 //[0 or 1] Dither : Applies dithering to simulate more colors than your monitor can display. This lessens banding artifacts (mostly caused by Vignette)
#define USE_BORDER 0 //[0 or 1] Border : Can be used to create letterbox borders around the image.
#define USE_SPLITSCREEN 0 //[0 or 1] Splitscreen : Enables the before-and-after splitscreen comparison mode. (Only partially working right now)
#define USE_TRANSITION 0 //[0 or 1] Transition : Shows a welcome screen and then transitions to the regularly scheduled programming
#define USE_DEPTH 0 //[0 or 1] Depth : Enables the possibility to display the depth buffer - You will still need to toogle it on/off with (*) in-game
#define USE_CUSTOM 0 //[0 or 1] Custom : Write your own shader by editing custom.h, and then enable it here.
/*-----------------------------------------------------------.
/ Ascii settings /
'-----------------------------------------------------------*/
#define Ascii_input_image 1 //[1 or 2] 1 = Color buffer, 2 = Depth buffer.
#define Ascii_spacing 1 //[0 to 9] Determines the spacing between characters. I feel 1 to 3 looks best.
#define Ascii_font 2 //[1 or 2] 1 = 5x5 font, 2 = 3x5 font
#define Ascii_font_color float3(255, 255, 255) //[0 to 255, 0 to 255, 0 to 255] What color the font should be. In integer RGB colors.
#define Ascii_background_color float3(0, 0, 0) //[0 to 255, 0 to 255, 0 to 255] What color the background should be. In integer RGB colors.
#define Ascii_swap_colors 0 //Swaps the font and background color when you are too lazy to edit the settings above (I know I am)
#define Ascii_invert_brightness 0 //[0 or 1]
#define Ascii_font_color_mode 1 //[0 to 2] 0 = font_color, 1 = image color, 2 = colorized grayscale
/*-----------------------------------------------------------.
/ SMAA Anti-aliasing settings /
'-----------------------------------------------------------*/
#define SMAA_THRESHOLD 0.05
#define SMAA_MAX_SEARCH_STEPS 32
#define SMAA_MAX_SEARCH_STEPS_DIAG 16
#define SMAA_CORNER_ROUNDING 25
// -- Advanced SMAA settings --
#define SMAA_EDGE_DETECTION 2 //[1|2|3] 1 = Luma edge detection, 2 = Color edge detection, 3 = Depth edge detection
#define SMAA_DIRECTX9_LINEAR_BLEND 0 //[0 or 1] Using DX9 HARDWARE? (software version doesn't matter) if so this needs to be 1 - If not, leave it at 0.
//Enable this only if you use a Geforce 7xxx series or older card, or a Radeon X1xxx series or older card.
// -- SMAA Predication settings --
#define SMAA_PREDICATION 0 //[0 or 1] Enables predication which uses BOTH the color and the depth texture for edge detection to more accurately detect edges.
#define SMAA_PREDICATION_THRESHOLD 0.001 // Threshold to be used in the depth buffer.
#define SMAA_PREDICATION_SCALE 2.0 // How much to scale the global threshold used for luma or color edge detection when using predication
#define SMAA_PREDICATION_STRENGTH 0.4 // How much to locally decrease the threshold.
// -- Debug SMAA settings --
#define SMAA_DEBUG_OUTPUT 0 //[0 to 4] 0 = Normal, 1 = edgesTex, 2 = blendTex, 3 = areaTex, 4 = searchTex - Only for troubleshooting. Users don't need to mess with this.
/*-----------------------------------------------------------.
/ FXAA Anti-aliasing settings /
'-----------------------------------------------------------*/
#define FXAA_QUALITY__PRESET 9 //[1 to 9] Choose the quality preset. 9 is the highest quality.
#define fxaa_Subpix 0.000 //[0.000 to 1.000] Choose the amount of sub-pixel aliasing removal. Higher values makes the image softer/blurrier.
#define fxaa_EdgeThreshold 0.166 //[0.000 to 1.000] Edge detection threshold. The minimum amount of local contrast required to apply algorithm. Similar to SMAA_THRESHOLD
#define fxaa_EdgeThresholdMin 0.000 //[0.000 to 1.000] Darkness threshold. Pixels darker than this are not processed in order to increase performance.
/*-----------------------------------------------------------.
/ Explosion settings /
'-----------------------------------------------------------*/
#define Explosion_Radius 0.2 //[0.2 to 100.0] Amount of effect you want.
/*-----------------------------------------------------------.
/ Chromatic Aberration settings /
'-----------------------------------------------------------*/
#define Chromatic_shift float2(2.5,-0.5) //[-100.0 to 100.0, -100.00 to 100.0] Distance (X,Y) in pixels to shift the color components.
//For a slightly blurred look try fractional values (.5) between two pixels.
#define Chromatic_strength 1.0 //Adjust the strength of the effect.
/*-----------------------------------------------------------.
/ Cartoon settings /
'-----------------------------------------------------------*/
#define CartoonPower 1.5 //[0.1 to 10.0] Amount of effect you want.
#define CartoonEdgeSlope 1.5 //[0.1 to 8.0] Raise this to filter out fainter edges. You might need to increase the power to compensate. Whole numbers are faster.
/*----------------------------------------------------------.
/ Advanced CRT settings /
'----------------------------------------------------------*/
#define CRTAmount 1.00 //[0.00 to 1.00] Amount of CRT effect you want
#define CRTResolution 2.0 //[1.0 to 8.0] Input size coefficent (low values gives the "low-res retro look"). Default is 1.2
#define CRTgamma 2.2 //[0.0 to 4.0] Gamma of simulated CRT (default 2.2)
#define CRTmonitorgamma 2.4 //[0.0 to 4.0] Gamma of display monitor (typically 2.2 is correct)
#define CRTBrightness 1.2 //[1.0 to 3.0] Used to boost brightness a little. Default is 1.0
#define CRTScanlineIntensity 2.0 //[2.0 to 4.0] Scanlines intensity (use integer values preferably). Default is 2.0
#define CRTScanlineGaussian 1 //[0 or 1] Use the "new nongaussian scanlines bloom effect". Default is on
#define CRTCurvature 1 //[[0 or 1] "Barrel effect" enabled (1) or off (0)
#define CRTCurvatureRadius 2.0 //[0.0 to 2.0] Curvature Radius (only effective when Curvature is enabled). Default is 1.5
#define CRTCornerSize 0.0100 //[0.0000 to 0.0020] Higher values, more rounded corner. Default is 0.001
#define CRTDistance 2.00 //[0.00 to 4.00] Simulated distance from viewer to monitor. Default is 2.00
#define CRTAngleX 0.00 //[-0.20 to 0.20] Tilt angle in radians (X coordinates)
#define CRTAngleY -0.15 //[-0.20 to 0.20] Tilt angle in radians (Y coordinates). (Value of -0.15 gives the 'arcade tilt' look)
#define CRTOverScan 1.00 //[1.00 to 1.10] Overscan (e.g. 1.02 for 2% overscan). Default is 1.01
#define CRTOversample 0 //[0 or 1] Enable 3x oversampling of the beam profile (warning : performance hit)
/*-----------------------------------------------------------.
/ Pixel Art CRT /
'-----------------------------------------------------------*/
// -- Emulated input resolution --
#define PixelArtCRT_resolution_mode 1 //[1 or 2] 1 = Ratio, 2 = Fixed resolution
#define PixelArtCRT_resolution_ratio (1.0/4.0) //
#define PixelArtCRT_fixed_resolution float2(320.0,160.0) //
// -- Hardness --
#define PixelArtCRT_hardScan -24.0 // Hardness of scanline : -8.0 = soft, -16.0 = medium
#define PixelArtCRT_hardPix -24.0 // Hardness of pixels in scanline : -2.0 = soft, -4.0 = hard
// -- Display warp --
#define PixelArtCRT_warp float2(1.0/64.0,1.0/24.0) // Display warp : 0.0 = none , 1.0/8.0 = extreme
// -- Type of shadow mask --
#define PixelArtCRT_ShadowMask 3 // Type of shadow mask : 1 = Very compressed TV style shadow mask, 2 = Aperture-grille, 3 = Stretched VGA style shadow mask, 4 = VGA style shadow mask
// -- Amount of shadow mask --
#define PixelArtCRT_maskDark 0.5 //
#define PixelArtCRT_maskLight 1.5 //
// -- Falloff shape --
#define PixelArtCRT_shape 3.0 // Falloff shape : 1.0 = exp(x), 1.25 = in between, 2.0 = gaussian, 3.0 = more square
// -- Amp signal --
#define PixelArtCRT_overdrive 1.25 //
/*-----------------------------------------------------------.
/ Bloom settings /
'-----------------------------------------------------------*/
#define BloomThreshold 20.25 //[0.00 to 50.00] Threshold for what is a bright light (that causes bloom) and what isn't.
#define BloomPower 1.446 //[0.000 to 8.000] Strength of the bloom
#define BloomWidth 0.0142 //[0.0000 to 1.0000] Width of the bloom
/*-----------------------------------------------------------.
/ HDR settings /
'-----------------------------------------------------------*/
#define HDRPower 1.30 //[0.00 to 8.00] Strangely lowering this makes the image brighter
#define radius2 0.87 //[0.00 to 8.00] Raising this seems to make the effect stronger and also brighter
/*-----------------------------------------------------------.
/ LumaSharpen settings /
'-----------------------------------------------------------*/
// -- Sharpening --
#define sharp_strength 0.530 //[0.10 to 3.00] Strength of the sharpening
#define sharp_clamp 0.035 //[0.000 to 1.000] Limits maximum amount of sharpening a pixel recieves - Default is 0.035
// -- Advanced sharpening settings --
#define pattern 2 //[1|2|3|4] Choose a sample pattern. 1 = Fast, 2 = Normal, 3 = Wider, 4 = Pyramid shaped.
#define offset_bias 1.5 //[0.0 to 6.0] Offset bias adjusts the radius of the sampling pattern.
//I designed the pattern for offset_bias 1.0, but feel free to experiment.
// -- Debug sharpening settings --
#define show_sharpen 0 //[0 or 1] Visualize the strength of the sharpen (multiplied by 4 to see it better)
/*----------------------------------------------------------.
/ Notalgia settings /
'----------------------------------------------------------*/
//Nothing here yet, but you will get to set the palette to use and toggle dithering, and maybe pixelate the image .. once the effect is done.
//For now it just displays the image with a C64 palette
/*----------------------------------------------------------.
/ Levels settings /
'----------------------------------------------------------*/
#define Levels_black_point 16 //[0 to 255] The black point is the new black - literally. Everything darker than this will become completely black. Default is 16.0
#define Levels_white_point 235 //[0 to 255] The new white point. Everything brighter than this becomes completely white. Default is 235.0
//Colors between the two points will stretched, which increases contrast, but details above and below the points are lost (this is called clipping).
// -- Debug settings --
#define Levels_highlight_clipping 0 //[0 or 1] Highlight the pixels that clip. Red = Some detail is lost in the highlights, Yellow = All detail is lost in the highlights,
// Blue = Some detail is lost in the shadows, Cyan = All detail is lost in the shadows.
/*-----------------------------------------------------------.
/ TECHNICOLOR settings /
'-----------------------------------------------------------*/
#define TechniAmount 0.40 //[0.00 to 1.00]
#define TechniPower 4.00 //[0.00 to 8.00]
#define redNegativeAmount 0.88 //[0.00 to 1.00]
#define greenNegativeAmount 0.88 //[0.00 to 1.00]
#define blueNegativeAmount 0.88 //[0.00 to 1.00]
/*-----------------------------------------------------------.
/ TECHNICOLOR 2 settings /
'-----------------------------------------------------------*/
#define Technicolor2_Red_Strength 0.4 //[0.05 to 1.0] Color Strength of Red channel. Higher means darker and more intense colors.
#define Technicolor2_Green_Strength 0.7 //[0.05 to 1.0] Color Strength of Green channel. Higher means darker and more intense colors.
#define Technicolor2_Blue_Strength 0.2 //[0.05 to 1.0] Color Strength of Blue channel. Higher means darker and more intense colors.
#define Technicolor2_Brightness 1.0 //[0.5 to 1.5] Brightness Adjustment, higher means brighter image.
#define Technicolor2_Strength 1.0 //[0.0 to 1.0] Strength of Technicolor effect. 0.0 means original image.
#define Technicolor2_Saturation 0.7 //[0.0 to 1.5] Additional saturation control since technicolor tends to oversaturate the image.
/*-----------------------------------------------------------.
/ Cineon DPX settings /
'-----------------------------------------------------------*/
#define Red 14.0 //[1.0 to 15.0]
#define Green 14.0 //[1.0 to 15.0]
#define Blue 14.0 //[1.0 to 15.0]
#define ColorGamma 2.5 //[0.1 to 2.5] Adjusts the colorfulness of the effect in a manner similar to Vibrance. 1.0 is neutral.
#define DPXSaturation 3.0 //[0.0 to 8.0] Adjust saturation of the effect. 1.0 is neutral.
#define RedC 0.36 //[0.60 to 0.20]
#define GreenC 0.36 //[0.60 to 0.20]
#define BlueC 0.34 //[0.60 to 0.20]
#define Blend 0.2 //[0.00 to 1.00] How strong the effect should be.
/*------------------------------------------------------------.
/ Monochrome settings /
'------------------------------------------------------------*/
#define Monochrome_conversion_values float3(0.21, 0.72, 0.07) //[0.00 to 1.00] Percentage of RGB to include (should sum up to 1.00)
#define Monochrome_color_saturation 0.00 //[0.00 to 2.00] Percentage of saturation to keep. Default is 0.00 , values above 1.00 boost saturation above normal.
/*-----------------------------------------------------------.
/ Color Matrix settings /
'-----------------------------------------------------------*/
// Red Green Blue
#define ColorMatrix_Red float3(0.817, 0.183, 0.000) //[0.00 to 1.00] How much of Red, Green and Blue the new red value should contain - Should sum to 1.000 if you don't wish to change the brightness
#define ColorMatrix_Green float3(0.333, 0.667, 0.000) //[0.00 to 1.00] How much of Red, Green and Blue the new green value should contain - Should sum to 1.000 if you don't wish to change the brightness
#define ColorMatrix_Blue float3(0.000, 0.125, 0.875) //[0.00 to 1.00] How much of Red, Green and Blue the new blue value should contain - Should sum to 1.000 if you don't wish to change the brightness
#define ColorMatrix_strength 1.0 //Adjust the strength
/*-----------------------------------------------------------.
/ Lift Gamma Gain settings /
'-----------------------------------------------------------*/
#define RGB_Lift float3(1.000, 1.000, 1.000) //[0.000 to 2.000] Adjust shadows for Red, Green and Blue.
#define RGB_Gamma float3(1.105, 1.095, 0.995) //[0.000 to 2.000] Adjust midtones for Red, Green and Blue
#define RGB_Gain float3(1.040, 1.030, 1.030) //[0.000 to 2.000] Adjust highlights for Red, Green and Blue
//Note that a value of 1.000 is a neutral setting that leave the color unchanged.
/*-----------------------------------------------------------.
/ Tonemap settings /
'-----------------------------------------------------------*/
#define Gamma 0.870 //[0.000 to 2.000] Adjust midtones. 1.000 is neutral. This setting does exactly the same as the one in Lift Gamma Gain, only with less control.
#define Exposure 0.000 //[-1.000 to 1.000] Adjust exposure
#define Saturation 0.000 //[-1.000 to 1.000] Adjust saturation
#define Bleach 0.000 //[0.000 to 1.000] Brightens the shadows and fades the colors
#define Defog 0.100 //[0.000 to 1.000] How much of the color tint to remove
#define FogColor float3(0.80, 0.40, 0.05) //[0.00 to 2.55, 0.00 to 2.55, 0.00 to 2.55] What color to remove - default is blue
/*-----------------------------------------------------------.
/ Vibrance settings /
'-----------------------------------------------------------*/
#define Vibrance -0.27 //[-1.00 to 1.00] Intelligently saturates (or desaturates if you use negative values) the pixels depending on their original saturation.
#define Vibrance_RGB_balance float3(1.00, 1.00, 1.00) //[-10.00 to 10.00,-10.00 to 10.00,-10.00 to 10.00] A per channel multiplier to the Vibrance strength so you can give more boost to certain colors over others
/*-----------------------------------------------------------.
/ Curves settings /
'-----------------------------------------------------------*/
#define Curves_mode 2 //[0|1|2] Choose what to apply contrast to. 0 = Luma, 1 = Chroma, 2 = both Luma and Chroma. Default is 0 (Luma)
#define Curves_contrast -0.20 //[-1.00 to 1.00] The amount of contrast you want
// -- Advanced curve settings --
#define Curves_formula 2 //[1|2|3|4|5|6|7|8|9|10|11] The contrast s-curve you want to use.
//1 = Sine, 2 = Abs split, 3 = Smoothstep, 4 = Exp formula, 5 = Simplified Catmull-Rom (0,0,1,1), 6 = Perlins Smootherstep
//7 = Abs add, 8 = Techicolor Cinestyle, 9 = Parabola, 10 = Half-circles. 11 = Polynomial split.
//Note that Technicolor Cinestyle is practically identical to Sine, but runs slower. In fact I think the difference might only be due to rounding errors.
//I prefer 2 myself, but 3 is a nice alternative with a little more effect (but harsher on the highlight and shadows) and it's the fastest formula.
/*-----------------------------------------------------------.
/ Sepia settings /
'-----------------------------------------------------------*/
#define ColorTone float3(1.10, 1.20, 0.90) //[0.00 to 2.55, 0.00 to 2.55, 0.00 to 2.55] What color to tint the image
#define GreyPower 0.11 //[0.00 to 1.00] How much desaturate the image before tinting it
#define SepiaPower 0.58 //[0.00 to 1.00] How much to tint the image
/*-----------------------------------------------------------.
/ Daltonize settings /
'-----------------------------------------------------------*/
#define Daltonize_type 1 //[1|2|3] Type of colorblindness. 1 = Protanopia (missing red spectrum), 2 = Deuteranopia (missing green spectrum), 3 = Tritanopia (missing blue spectrum)
/*-----------------------------------------------------------.
/ Film Grain settings /
'-----------------------------------------------------------*/
#define FilmGrain_intensity 0.6 //[0.00 to 1.00] How visible the grain is. Higher is more visible.
#define FilmGrain_variance 0.55 //[0.00 to 1.00] Controls the variance of the gaussian noise. Lower values look smoother.
#define FilmGrain_SNR 6 //[0 to 16] Higher Signal-to-Noise Ratio values give less grain to brighter pixels. 0 disables this feature.
// -- Advanced Film Grain settings --
#define FilmGrain_mean 0.50 //[0.00 to 1.00] The average mean of the gaussian noise. Probably best kept at the middle value (0.50)
//A sideeffect of the Film Grain effect is that it also dithers the screen.
//You don't need both the Film Grain and the Dither effect enabled at the same time.
/*-----------------------------------------------------------.
/ Vignette settings /
'-----------------------------------------------------------*/
#define VignetteType 1 //[1|2|3] 1 = Original, 2 = New, 3 = TV style
#define VignetteRatio 1.00 //[0.15 to 6.00] Sets a width to height ratio. 1.00 (1/1) is perfectly round, while 1.60 (16/10) is 60 % wider than it's high.
#define VignetteRadius 1.00 //[-1.00 to 3.00] lower values = stronger radial effect from center
#define VignetteAmount -1.00 //[-2.00 to 1.00] Strength of black. -2.00 = Max Black, 1.00 = Max White.
#define VignetteSlope 2 //[2 to 16] How far away from the center the change should start to really grow strong (odd numbers cause a larger fps drop than even numbers)
#define VignetteCenter float2(0.500, 0.500) //[0.000 to 1.000, 0.000 to 1.000] Center of effect for VignetteType 1. 2 and 3 do not obey this setting.
/*-----------------------------------------------------------.
/ Dither settings /
'-----------------------------------------------------------*/
#define dither_method 1 //[1 or 2] 1 = Ordered dithering (very good and very fast), 2 = Random dithering (different but slightly slower dithering)
//Note that the patterns used by Dither, makes an image harder to compress.
//This can make your screenshots and video recordings take up more space.
/*-----------------------------------------------------------.
/ Border settings /
'-----------------------------------------------------------*/
#define border_width float2(0, 120) //[0 to 2048, 0 to 2048] (X,Y)-width of the border. Measured in pixels. If this is set to 0,0 then the border_ratio will be used instead
#define border_ratio float(2.35 / 1.0) //[0.1000 to 10.0000] Set the desired ratio for the visible area. You MUST use floating point - Integers do not work right.
//Examples that work: (1680.0 / 1050.0), (16.0 / 10.0), (1.6) Examples that does NOT work right: (1680 / 1050), (16 / 10)
#define border_color float3(0, 0, 0) //[0 to 255, 0 to 255, 0 to 255] What color the border should be. In integer RGB colors, meaning 0,0,0 is black and 255,255,255 is full white.
/*-----------------------------------------------------------.
/ Splitscreen settings /
'-----------------------------------------------------------*/
#define splitscreen_mode 1 //[1|2|3|4|5|6] 1 = Vertical 50/50 split, 2 = Vertical 25/50/25 split, 3 = Vertical 50/50 angled split, 4 = Horizontal 50/50 split, 5 = Horizontal 25/50/25 split, 6 = Curvy vertical 50/50 split
/*-----------------------------------------------------------.
/ Transition /
'-----------------------------------------------------------*/
#define Transition_time 5000 //[1 to 60000] Milliseconds the transition lasts (1000 milliseconds is 1 second)
#define Transition_texture "Winners_Dont_Use_Drugs.png" //["filename"] Filename for the texture to use. Put your custom textures in SweetFX/Textures/
#define Transition_texture_width 720 //Image width.
#define Transition_texture_height 480 //Image height.
#define Transition_type ImageFadeOut //Can be "FadeIn", "FadeOut", "CurtainOpen", "CurtainClose" or "ImageFadeOut"
/*-----------------------------------------------------------.
/ Depth /
'-----------------------------------------------------------*/
#define Depth_z_near 0.01 //[0.00001 to 100000.0] Camera z near
#define Depth_z_far 100.00 //[0.00001 to 100000.0] Camera z far, must be further than the near value.
/*-----------------------------------------------------------.
/ Custom settings /
'-----------------------------------------------------------*/
#define custom_strength 1.1 //[0.00 to 1.00] Adjust the strength of the effect
Your preset is awesome, thank you!
HEY MEN I NEED A SWEETFX LIKE THIS STYLE FOR ARMA 3 PLEASE MAN
I'll be very grateful
THANKS AND BYE FRIEND!
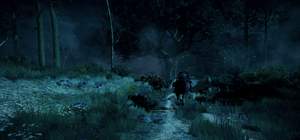
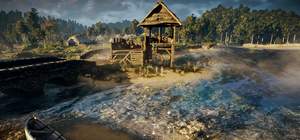
@shadow8531 as it seems you like the fantasy themed graphics: oversaturated with too much vibrance. 2nd row, 1st and 2nd pics are super horrible without sweetfx. with sweetfx both are perfect. if you don't want this big changes, i suggest you to check out K-putt'e preset. subtle changes, but very good preset. my favorite, and the one i use
This preset makes my image too bright/white and washed out. I prefer Vanilla W3, alot more colour in it.
hello time better :( i'cant Download http://www.mediafire.com/download/qqyyxyc7s58d5cb/ please reupload :( SCROLL LOCK can't activ thanks
Where is 1.4A/B ???? T.T
hey rain.. turn it on? meaning set SMAA on your sweetfx preset to "1" ???
@nathan02: oh, i forgot turn it on :v. Fixed
Mmm, this looks better than previous versions, gonna try it.
hey rain. this version has no smaa enabled on your preset right, but you said on your description, recommended setting should be AA = off.. should I turn it off in game or on ? coz there's no SMAA in the preset.
@Smoshi: it's totally different.
I saw on Nexus you uploaded 1,000 times worse. What is the difference between this preset and that?
Use Lite version: w/o Bloom.
thx dear rainy
but distant trees are so blurred how to fix ??
@Billtaco: Increase it in game :)
Dear rainy
the V 2.1 == distant trees are so blurred ??
Dear rainy:
V 2.1 you said
Decrease Sharpening
why ?? too much impact on FPS ??
how could i make the Sharpening increased
Too bad...maybe other playes has v1.3 version of this mod?
@Bombatomica: that's right
@aqibzahid11: Oh, i had this game on Origin too, but i dont install it :(
@gto: hard to sastisfy everyone :D
@vandr: Hi, i don't keep v1.3 :(
Dear creator of this preset
Is there any chance to get the link to v1.3 version?
Well the Scroll Lock on/off trigger doesn't work now :(
by any chance,someone can upload v2.1 full to other site? I can't find fix to my slow speed download at Nexus (2-12kb/s)
@rasak i still have it. I uploaded it for you here: http://www.filedropper.com/sweetfxsettings_4
Hi, For My opinion,
v1.4.A = Vegetation is Better and more Realistic (green colors)
v2.1 = Interior Ligthing is Better, Night is Better but dnt like the Vegetation colors.
^^
Bro can u please make a preset for need for speed rivals for reshade?
So, i have to delete SweetFX folder plus the file you name in the description, right? Thanks, sorry to bother you :)
@Bombatomica: Yeah, V2 is used Reshade Framework instead of SweetFX, so you must delete all old files 1st.
@rasak: What a pity! I don't keep v1.4.A :(
@Dapix97: i will :D
could you please load some comparisons? i would like to see how the 2.1 is
First of all, amazing work, man; the games just got much better. But I really enjoyed v1.4A and would like to use it again. Could you please provide a download link ?
Hi Rain, first of alla congratz for your splendid work :)
I just have few questions. I'm using the 1.4b version, i'd like to try the new 2.1 version but i have to disinstall old version first? To do So, i have to cancel sweetfx folder too, or only the files you indicate in your guide? Thanks ;)
@rainynguyen
Yes I know, but MasterEffect does not work with RadeonPro filters and the game don't even start, so I have to use SweetFX, cause I like those RadeonPro filters.
@Osoito: Oh sry, just download the archive on nexus, that's enough.
@renk23: i made 2 versions, you can download Lite version for less performance impact.
@negru08: yeah, all on nexus:
@Vegapy: here you are: http://www.mediafire.com/view/fztvb77ig3h993k/SweetFX_Settings_1.4.B.txt
I need the v1.4.B link, where i find it please? thanks guys
Where can I get the 2.1 settings? Are they on nexus mods? BTW great preset. You are number 1 followed very closely by Natral colors of Gia ( they are just a tad to dark for my taste but great with natural looking colors).
I put the 2.1 preset on SweetFX 2.0 + reshade and still looks great. without FPS drops. I don't know why. Now I finally gave up of 1.4A version.
Sorry my bad english :/
In this installation guide you say some would have to download the preset and replace the old one and on Nexus you we do not have to download anything more.....what is the right one?
Hi all :)
v2.0 was added bloom + SMAA, you can turn them off to get better frame rate ( esp bloom).
@Negru08: Decrease #define sharp_strength in sweetFX_settings.cfg (open with notepad)
Damn 2.0 does look amazing but I wonder what caues my GPU to go from 50-70 normal GPU utilization to around 70-90 with this on? Also is there anyway to just turn down sharpening just a bit. With this preset its to high and does cause artifacts and like static freckles in geralts Armour and face.
Other then that damn impressive. When my SLI gets here I wont have to worry to much about the graphic hit.
Side note: ITs a little dark but not horribly.
Sorry for the second post, but why is the fps impact 5-10 fps? Maybe due to some complex form of antialiasing?
Are there comparisons between 1.4 and 2.0? Overlapped screenshots where you can slide with the mouse?
off... make a 2.0 for GTA V please!!!!!!!!!!
God!!!!!! The 2.0 is the best thing out there so far ... good job dude!!!!
2.0 looks pretty good, getting some weird artifacts though.. the FPS is pretty huge compared to 1.4 :/ I can't afford to lose 10 FPS so I'm gonna have to say pass to this until the issue is fixed. (Did turn bloom off)
just tryed the 2.0.....really good, but i don't want to lose 10 fps just for a post-processing effect......
i'm sorry man but this sucks
do you really lose 5-10 fps with this version? why is that?
Well dont working and for what is reshade when this page is about sweetFX?
@Osoito: Uninstall V1.4 before using v2.0 :). Download 2.0 on nexus then extract to ...\The Witcher 3\bin\x64, that's all
@EscapistsHarmony: i see, it looks terrible, don't know why. You can try my v2.0.
@rainynguyen: done. Monitor has no blue tint, I just removed some red one. But the problem with too dark zones of ambient occlusion remains. I tried to adjust brightness and contrast during calibration and in game settings. There was no difference( I don't say the issue considered the nights. There are pitch black AO zones even during daytime.
http://s28.postimg.org/635sox6cd/witcher3_2015_05_28_19_13_35.png
http://s28.postimg.org/hx8y8tf8d/witcher3_2015_05_28_19_14_18.png
http://s28.postimg.org/q40y0e5b1/witcher3_2015_05_28_19_14_21.png
http://s4.postimg.org/ujk5y4del/witcher3_2015_05_28_19_29_41.png
http://s4.postimg.org/tg01m5srh/witcher3_2015_05_28_19_29_43.png
First screen. Barrels' texture is not visible.
Second and third show textures of wooden wall behind the table.
4th and 5th have the best visible problem. (Table)
Do I have to deinstall SweetFX first or do I just copy the files of version 2.0?
@Sleepy_dude: very nice shots <3, esp 3rd pic.
@EscapistsHarmony: I think you should re- calibrate your monitor :), use this site: http://www.lagom.nl/lcd-test/. With my Preset, the nights are brighter than Vanilla :v
@melibond64: did you paste "sweetFX_settings.txt" to ...\The Witcher 3\bin\x64\SweetFX ? Can you run others preset?
I even tried pressing the scrollock button to put the effects on and off but nothing changes...
HALP!
Installed it the right way,respecting all the things you wrote...and it even said succeeded when i started the game,but i see no difference in visuals whatsoever.
Help.
Hi! Would like to add some critics)
1) 1.4 A version has pitch black zones esp in interiors, but also in open areas too. Many details disappear.
2) Blue tint everywhere)) Is there any way to take it away form menus and those overshaded zones i've mentioned in 1)?
Thanks for you work!
@rainynguyen
http://i.cubeupload.com/MgWLHG.png
http://i.cubeupload.com/LeA7gZ.png
http://i.cubeupload.com/90mXog.png
http://i.cubeupload.com/aHPHfy.png
http://i.cubeupload.com/sfvDWn.png
they're not all that good, and they have some noticible jaggies (dont zoom in all the way). I'll try to take some 4k ones later if you want.
Thật không thể tin được! :v
đẹp quá bạn ơi. mà tông màu theo mình hơi cool quá rồi :3
Can you make darker version? Like the darkest you can go before losing small details to darkness?
I saw a lot of presets. This best I've ever seen! Incredible! you are the best !! Thank you!
Ver2.0 is FINAL version, i will use Reshade framework instead SweetFX.
Do you plan a "Final Version"? Because I do not want to look up everyday if you added sth. ;D
Attention Windows 8.1 Users: If you are having crashing at startup running 1.4, follow these steps:
1. Backup dxgi.dll from x64 folder
2. Rename reshade32.dll to dxgi.dll
3. Open your new version of SweetFX_Settings.txt using Notepad++
4. Click Encodings -> Covert to ANSI. Save.
5. Launch Game.
Error, unable to copy file "reshade64.dll."
After the official Witcher 3 patch yesterday the default textures are sharper so now with your preset the textures are far too sharp. I turned down texture detail in the video settings which helped, but I hope you address this in your next version. Amazing work so far, the game looks fantastic with your preset and is FAR more fun.
1.4 has a very blue layer over the screen, can this be removed?
Thế thì chịu vậy :(, mà cũng đâu cần toggle đâu, vào game nó tự bật sẵn rồi :v
Mình có down file rar ở I.1 rồi mà, vào game cũng báo là Pressing SCROLL LOCK to toggle SweetFX, nhưng lại không sử dụng được :(
I'm working on Version 2. Yeah, ver 2, not 1.5, you know what it mean :))
i3oomz: như hd, down lại file rar kia mới xài dc, cái rar cũ ko xài dc đâu
Nút scroll không dùng được bạn ơi, bình thường mặc định nó là nút trong game rồi, mình đổi nút khác nhưng vẫn không turn off/on SweetFX được :(
@negry08: reshade64.dll is d3d11.dll. And you must download my archive 1st, check step-by-step guide in HOW TO INSTALL.
@Sleepy_dude: send me :D
@rainynguyen
They unfortunetly are 1080p (png) but if you want, i can take 4k ones. should i send the link anyways?
I cant get this to work. I was prevously using K-putts sweetfx. Well I downloaded the rainy sweetfx and copied it over the prevous stuff and when I click play it doesnt load. Any idea why? I also noticed you dont have a 64 reshade dll. Why?
@thedarkplayer: Yeah, you can also force FXAA in NCP, but i prefer SMAA in SweetFX (lose some fps).
@Sleepy_Dude: you mean 4k shots? Share me the link plz :D.
amazing job! If you want, I have some 1.4a lossless screenshots i can send you. On a side note, I saw much improved visual quality and performance by renaming reshade32.dll to reshade64.dll.
Sorry, my bad, toggle is working, i was copying your settings in wrong folder. Thanks again!
Hi, and thanks for sharing your great work!
Just downloaded your preset but the toggle on/off dosen't work for me. Any help welcome!
Windows 8.1 pro x64
Never mind, figured it out.
I know this might be a lot to ask, but could someone upload 1.4 A to another site. I've been unable to download from Mediafire for about a month now.
Hi, thank you for the work. I can't see anymore the tweaking section for the GPU. If I use 1.4A preset, in the nvidia panel control should I use the old tweak indication or I return to full default?
Thanks a Lot man, very supportive, now i can enjoy ur beautiful work :) And.. Oh My God, what a Work this 1.4 A o.O'
The old rar: http://www.mediafire.com/download/ysjmhzxq27tylyq
You also can remap the toggle key:
Open file: "Global Settings.txt" then change #define ReShade_ToggleKey xxx
====
List of virtual key codes: http://www.kbdedit.com/manual/low_level_vk_list.html
I Really want the old rars :/
Is There a way to simply disable this toggle Thing? or even remap it? My scroll Lock is f*cked up and i cant toggle on in the game. if i place the archives in the game folder, i obviously want to use them... PLEASE HELP ME !
@PeKING: It CAN'T, you hate this effect?
@bubbagump326: Use: "Lift Gamma Gain settings "
@Hodi: ty :3
1.4a looks amazing! :) Comparison here
https://www.youtube.com/watch?v=aN2jxG5_ydY
the players are a little too pale for me, what setting can i change to give them a little more color?
thanks and keep up the great work
Hey, Thanks rainynguyen for your work and effort to make this game better, have not started playing it much yet because I want to see what the future dev patches can do for the visual. For now your sweetFX rules!
Why did you dim colours so much? Now it looks like it lacks vibrance much.
Is it possible to disable the raindrops effect on screen when it's raining?
Thanks :)
thank you so much!! I downloaded a bunch of different versions of Sweetfx and reshade and everything else i could think of last night. today i came here tried again from scratch and it is finally working. soooo happy!!!
i think there are issues with the toggle button for the other distributions: screenshots work, shaders compile and have positive status at load up but the toggle was not working. i tried manually setting this, and also remapping nothing worked until i followed the directions here. thanks again!
Hey man, you will never guess what made it work. Restarting computer, wow.. (I even reinstalled the game for nothing)
Preset is great, a lot better than default, can finally just enjoy the game and not worry about too much yellow. Thanks!
Try renaming d3d9.dll to dxgi.dll
I found out that file causing problems is d3d11.dll. As soon as I remove it, game launches, and reports SweetFX working, but no effects in game.
Anyone else got it working on AMD card?
Yeah, use whatever you want.
Both SMAA on and FXAA on in SFX
also turn on in NV ......???
thx dear
@billaco: nope :), u can use both at same time.
@billaco: nope :), u can use both at same time.
By the way what's kind of AA in this game ??
is it possible :
in SFX ==> SMAA on + FXAA on
and just leave NV control penal as default ??
HO dear rainy....
Sharpening: Off ( already turn it on in SweetFX )
==> if this option on in game
will conflict or mask the effects of sharpening in SFX ???
No error :( Just SweetFX disabled in top left, bizarre, i got it working with v1.3, Maybe it was an issue with the 1.4b.
@delicatessen: Reinstall windows =))
@LilljacobL: Ty <3
@Second: what error?
The latest RAR with enabled toggle doesnt work for me (at all). SweetFX just fails to load.. used the old version + old rars and its back to working perfectly.
On, off toggle working perfect and the latest preset just looks amazing.. I could never go back to stock and play..
Tried even that now, enabled SweetFX from there and still doesn't run. Ehh..
hmmmm..........Did you try using Radeon pro?
Hi, I can't run the game with the preset.
When I remove files from your "uninstall instructions" it works again.
Updated vcred, directx is up to date. Using Win7 x64 on AMD card with no MSI afterburner. Also, I have those Windows updates already installed. Have any suggestions?
Download load the rar again if u wanna toggle sweetFX :D
just copy the preset only ?
@shafat77:
- Lower blue: #define FogColor float3(x.xx, x.xx, x.xx): raise 3rd value.
- More red + yellow: #define Vibrance_RGB_balance float3(x.xx, x.xx, x.xx): raise 1st (red) and 2nd ( green) value.
Absolutely brilliant preset. The best one yet. Loving every second of it. My only gripe is that since i play it on a new led tv, my blues are already high to begin with. Dont wanna bother u but could you tell me how to lower the blue and add more red + yellow to the preset? Kind regards
I found out the way to enable Toggle function, download my rar again ( at I-1). Pressing SCROLL LOCK to toggle SweetFX.
Hi, that's why i posted the old one (v1.3) in OPTIONAL :">.
" Trying to please everyone is a recipe for stress, misery and frustration. Be yourself. It’ll be good to know who’s down with that." =))
Thank all!
@Capati: no, i didn't change the blue value in 1.4, just red + green.
I prefer the old 1.3 too. I don't know, but the new 1.4 has so much blue?
Best one is this one imo. Excellent job.
Personally I prefer old 1.3
okay just manage to find the workaround about the fullscreen.apparently i cant change it at main menu,have to be in game to change it.
hi,after installing this,i cant change to fullscreen and it kept on borderless window.is this made just to run fine on borderless only. Thanks anyway for the great preset!love it so far but some places i just love to have the warm feeling from the vanilla but i guess been too greedy is bad.
@aywa912:
I didn't enable SMAA or FXAA in SweetFX @@!
@FromTheAshes:
Can you show a pic?
Hey man, was wondering if you knew how to remove the grainyness to the camera in game. I don't have filmgrain on yet it still looks like its on.
I'm didn't like the anti aliasing.How can i change to original quality ?
SweetFX is not like Photoshop, if adding more green, the orther colors will be ruined :(
Nice, now yellows and greens seems to be a little more greener and yellower
need more green tone
1.4 looks nice :) God work as always. Thanks
@gastovski: Why not :)
Does this work with AMD cards?.
Nvm, got it working now for whatever reason...
@Andyboy: i already fixed it ~ 15 mins ago, download my preset again plz :)
I get Unterminated String error. I've tried so much, but it won't work :(
haven't tryed the 1.4 yet (looks stunning) but 1.3 keeps randomly crashing.....everything works just fine but after a couple min it crash, any ideas?
Awesome thx :)
@PeKING: fixed :))
Nevermind..figured it out. All is well.
Hmm...now when I start it up the message the top says SweetFX disabled.
Thank you. Now it works but film grain is back on ;)
Download again =))
Yep. 1.4 is throwing the same Unterminated String error for me.
I also get Unterminated String error from file Sweet.fx, Line 20. with new 1.4
@Dapix97: avoid the blurry screen :)
@ Laurent: The last thing you should do is reinstall Windows =)
@Lulljacob: ty :3
'Unterminated String' error from file Sweet.fx, Line 20. with new 1.4
this my pict in my old PC :)
hehehhe thanks man im wait V 1.4
[IMG]http://i60.tinypic.com/b4gvuw.jpg[/IMG]
Looking real good, only change I made was increase brightness. Awesome work, thanks..
Thanks for advice, but it is already in ANSI :(
Don't know what to do, why am I the only one who has problem ?
sry but why should i turn blur off?
@crimsonidol: <3, Film grain is great effect for TW3 :D.
@Laurent:
The compiler only understands ANSI format, maybe your " sweetFX_settings.txt" file was saved in UTF-8 format. Using Notepad++ to convert to ANSI :D
@aprilgame48: ty <3
hmmmb i use this preset,nice for me thanks
wait 1.4 hehehhe hmmmb shadows is bad
Hello, i beg you to help me, i can't launch any sweet fx, i have this screen when i launch the game :
http://www.noelshack.com/2015-21-1432372886-photo.png
It lasts 1/2 sec, then go back to desk...
Can you please helpme :(
I am Nvidia, no fraps and tryed everything...
Nice, very nice preset, I like the Film grain effect and SMAA, looking forward for what comes up next. Great!
@shafat77: Thanks :3
You will like my v1.4 :))
Greetings Rain. I absolutely love your presets. Been rocking gta5 preset for a while now and it changed the whole game for me. As for this game, its brilliant as well. Now, as a fan, I would love to ask you if you can add slight vibrance (more red, less blue tint) to your preset. I like the original game color, but urs add an enhanced feel to it. So a lil more red would be much appreciated. Kind regards
Thank all :)
@Hagerino + megatonante: yeah, i created v1.3 at night. v1.4 will be better so far.
@SteXmaN: stay calm, maybe today :)
@Nozi87: Oh yeah, great video, can i use it on Description? :)
Hi great preset, made a video hope you all like it
https://www.youtube.com/watch?v=y5thkbEcnWQ
@rainynguyen ETA for 1.4 ?
Amazing work o7
@Hagerino maybe you are right. I installed this preset today, when it was daytime, and I had to raise the brightness parameter mentioned in the description by 50 because I felt the shadow where too dark. Now is night time, and when in the game is morning or noon the grass and the cities are almost TOO bright.
this is the best setting out there for witcher3.
Hi,
i'm using your preset now. Shadows were to dark for me so i made them brighter. Did you create the preset at night? Since Pupils dilate at night the perception is different as playing in at daylight. So optimally we would need 2 presets, one for playing at night and one for daytime.
@megatonante:
It's easy to say but really really hard to do it :((.
BUT.........a good news for you all: i'm working so hard to release v1.4 - giant improvement ( it will also fix your issue :) )
@Billtac:
This is just my suggestion to get the better performance + quality, you can choose whatever you like.
Sharpening is an option in OPTION => VIDEO=> POSTPROCESSING.
Turn In-game AA OFF if you'r using FXAA in Nvidia Control Panel. It's useless and you will lose 1-3 fps for nothing.
By the way :
In game settings,
Sharpening means FXAA or similar effects ??
and What kind of AA in game Antialiasing : on
???
Thx dear master
Dear master :
2. In-Game Setting:
+ Motion Blur: Off
+ BLur: Off
+ Sharpening: Off ( already turn it on in SweetFX )
+ Antialiasing: No ( "Yes" if you'r using AMD VGA)
I have Nvidia card
if i turn on all the above settings in game esp about AA and sharpening
What will happen ?? interfering your settings or some of your effects will not show??
I really like this preset, I have only one thing I don't like: colors that in the vanilla game were bright now are really washed out. For example red fonts, yellow indicators, green marks on the map. And colorful monsters too, I guess, like drowners.
Is there a way to preserve the way the scenery looks while keeping bright colors for everything else like monsters and stuff?
@aprilgame48: Thanks, but my internet is not good for uploading :(
@Yka04: glad to hear that :)
@rainynguyen Solved the stuttering. The Sweetfx was not the issue, it was my ini file. Thx for the amazing work, makes the game so much better.
please upload in youtube this preset,i can use in this time guys
@rainynguyen Thanks, reinstalling vcredist worked for some odd reason, Looks fantastic (even better with ingame sharpness on low). And yeah other SweetFX work for me ^_^
@jvlk: Yeah, gamma default
@gannicus:
I prefer FXAA in NCP. And dont use in-game sharpening.
I mean gamma
@rainynguyen do you use the default gamme?
Or do you have it turned down in game?
@Osoito as it says Temporal AA thought it was TXAA. So, it's better to disable it and activate FXAA or SMAA in SweetFX or Nvidia config? The grass looks very sharpened.
@gannicus The Witcher 3 does not support TXAA. The Anti Aliasing is made by CDPR themselves. It is FXAA with a temporal thing in it and without any blur effect.
Another question, is Nvidia's FXAA better than TW3's TXAA? Any comparative pic?
@rainynguyen: Ok, but I didn't get it yday without SFX. However, your config looks nice but seems too dark and with too much contrast to me. Nice work though. I'll try to make it a little brighter and contrast-softer.
@gannicus: This is game bug, i also get crash w/o sweetFX :D. Need to wait CDPR to fix it.
I get a crash when I change to the desktop or another app and I come back, TW3 stops working.
@Yka04: Hm....No one complains about this issue...Do you use any software like MSI- AB, Fraps in-game?
Great! But activating this Sweetfx makes the game stutter. Any idea how to solve that?
I will after work ;) 4pm GMT
You can use radonpro tool even on nvidia cards to run SweetFX with W3. Tutorial: https://www.youtube.com/watch?v=9X1CrTYyV7o&safe=active
@amiga4ever
Can you please upload to Mediafire? Thank you.
I have 1.2 if someone want it but didn't notice any frame drop on 1.3
Definitely it's the best preset for W3 at the moment. Game looks outstanding!
@Second:
Try reinstalling vcredist
And can you run other sweetFX?
@whatsamatteryou:
Strangely, i just did a small tweaks in 1.3, didn't add anything more. And i still get 0 fps loss.
What a pity! i don't backup the old version.
Hello rainynguyen,
Can you please upload v1.2 for me please? Maybe to mediafire? I was experiencing FPS loss with v1.3. Thank you.
-James Nguyen
By far the best looking colors / lighting, but i cannot get it to work, even with the windows update the game crashes on launch :(
@Waddams:
Thanks :). I reduced the sharpening indeed.
@Hamisxa + USAS:
Thanks
This function isn't working in TW3 :(. This is a bug.
@Charly60:
As i said in description: 0 fps loss :).
It looks amazing!
However the scroll-lock button doesn't seem to work. I'd like to compare it to the original.
hi man !! =) tell me if i can run this mod with my gtx 760 4g ? or this mod is just for ultra config ? because i turn my game with high settings but your mod seems amazing!!!! so tell me if it's possible =) ?
Hey man could you add a enable/disable button like GTA V has? I mean you press "insert" (or whatever button you please) and it turns on/off the ReShade. It would help us notice the difference a lot, or just disable it in some moments.
Amazing job though, just this little thing would make it a lot better.
The best just got better! Nice job mate!
I still felt the black crush was a bit too much so I increased rgb lift settings from 0.97 to the default 1. This lessened the crush while still keeping your wonderful image richness intact. Also, maybe it is placebo but I swear the over sharpened look I thought before with trees isn't really there now.
I don't know if you meant to do so but your preset looks closer to the 2013 style than all those specific 2013 presets do. Those others just cranked up the blue making everything far too cool while yours has balanced colour and just looks incredible.
I feel you could call it a day and have the best preset out there with this but I welcome to see any more tweaking you do! :)
@rainynguyen It's awesome work man!
Unfortunately, I removed it, but the "Reshade 0.17.1.813 etc." is still displaying on top left corner :(
What do I need to do for this to go off?
@rainynguyen Use your SweetFX! AHHHHHHHHHH no! This option on in NVIDIA Control Panel!
AMAZING SweetFX <3 4k + HairWorks + HBAO = 45/50fps :3
@jcosovnikar: what the hell is that :v. And what software u used in game @@!. Maybe that's the reason..Try turning it off
How do I remove the green bar?
Look! :(
https://www.youtube.com/watch?v=jHNqp-45MqY
@Osoito: SMAA in SweetFX will make the image sharper, not blurry like FXAA.
I'm using FXAA in NCP and don't have any problems with it :D
My Problem is that you say that the ingame Anti Aliasing is bad and with SMAA or FXAA on SweetFX the picture just gets blurry :D
@k3lt:
Fixed :D, download my preset again, Thanks :)
'Unterminated String' error from file Sweet.fx, Line 20.
http://i.imgur.com/vxpnuxV.jpg
Getting this error, does anyone know how to fix it?
@danteafk:
U can turn it on, read OPTIONAL to know how to enable it :)
In-game AA is very bad.
Is there already SMAA in this sweetfx or why should we disable AA ingame?
@badolf4:
Ah, i renamed it to d3d9.dll..
rainynguyen
I downloaded but it is only Reshade32.dll. , not Reshade64.dll
looks REALLY good, but i find that some shadows are way to dark, even in clear daylight... to bad, really wanted to use this one
@Badolf4:
Download my rar again :D
rainynguyen
Can you help me?WHen is Reshade64.dll
It is working...I had failed, Sry
@rainynguyen Does this mod work with the newest patch? (1.03) Because I think that the effects went off after this update.
Hey guys, i have big problem!when i click Reshade setup and select witcher 3 i got a messeage " Unable to copy file Reshade64.dll" please help:(!
@Osoito:
You can use SMAA in SweetFX instead using FXAA in NCP, but you can lose some frame rate depend on your PC
@rainynguyen First of all great work with the Mod. I have one question: Do I really have to turn FXAA on because the whole picture is much more blurrier.
ReShade toggle function is currently bugged in TW3.
==========
You can turn sweetFX off by alt- tabbing out of the game => rename "sweetfx_settings.txt" to anything u like => go back your game :D
Before my work today I launched Witcher 3 for few minutes to see this amazing graphic :))) Best game ever.
@jonathan1107 I use RadeonPro software to toggle on/off key. Reshade doesn't work for me
IS there any Way to get the TOGGLE key to work with the witcher 3 reshade???
@gto + amiga4ever:
Thanks ^^!
@alienw + waddams: i will adjust those in my next version :)
Amazing piece of work! Now game looks awesome! I can't imagine to play on default colours anymore
Hi, I love your preset, but just a question :
Is there a way to make shadows less solid dark ?
'Cause it's really hard to see sometimes ! (I don't know which option to change)
You and k-putt need to get together and make a super preset. Your image (especially trees from a distance) looks a bit too sharp to his regardless of me playing around with the lumasharpen setting and you seem to have a bit of black crush going on since the gamma slider shows no picture and I have noticed the crush in menus and in some shadows.
Other than those two things, I prefer your colours/saturation level and image richness to his.
OH Yeah, After GTA 5 You come here, Thaks You for your great Work <3
@Risovonvodka:
U mean "Disabled"?
Do you use any sweetFX Preset before using mine?
SweetFX is auto ON at the start.
1.2 is working great now. Thank you.
Hey, I installed it but when I run the game I get a message in the left top corner :SweetFX desabled.
It is set as 1 in config file. Any idea?
@jonnecy:
Toggle funtion isn't working in TW3...
Reshade32.dll is d3d11.dll :), i renamed it.
@Zoyer:
ty :)
Ah it was the film grain! Thanks you other people who wrote it! :)
where is the ReShade32.dll ? I dont have one in my x64 folder.
key for toggling it on/off ?
Hm... i will turn film grain off :)
Looks great! But I have to turn off your Filmgrain and now looks even more amazing
Have you thought doing something about the grain when it's dark? :) It looks amazing otherwise!
@Pyerre: Done :)
Thx !
@Pyerre: Yeah, will upload soon :)
Pretty nice on the screenshots ! Good work i'm gonna try this !
Could you make some screen at night ?