32 minutes ago
Black & White: Last Light (SinCityStyle)
Preset description:
"Sin City" / "Limbo" inspired and based of my "Complete Metro Overhaul" settings, this preset provides a different Metro experience...with it's own charme and atmosphere!
-------------------------------------------
This preset is great (and mainly designed) for taking screenshots and making wallpapers. Some areas look really awesome. If you need one for actual gameplay, just use my "Complete Metro Overhaul" preset.
-------------------------------------------
HD Gameplay:
------------
http://www.youtube.com/watch?v=olH3NlCr9-I&hd=1
/*-----------------------------------------------------------.
/ Choose effects /
'-----------------------------------------------------------*/
#define USE_SMAA_ANTIALIASING 1 //[0 or 1] SMAA Anti-aliasing : Smoothens jagged lines using the SMAA technique.
#define USE_CARTOON 1 //[0 or 1] Cartoon : "Toon"s the image. (Interferes with SMAA, CRT, Bloom, HDR and Lumasharpen)
#define USE_HDR 1 //[0 or 1] HDR : Not actual HDR - It just tries to mimic an HDR look (relatively high performance cost)
#define USE_LUMASHARPEN 1 //[0 or 1] LumaSharpen : Also sharpens the antialiased edges which makes them less smooth - I'm working on fixing that.
#define USE_MONOCHROME 1 //[0 or 1] Monochrome : Monochrome makes the colors disappear.
#define USE_LIFTGAMMAGAIN 1 //[0 or 1] Lift Gamma Gain : Adjust brightness and color of shadows, midtones and highlights (avoids clipping)
#define USE_CURVES 1 //[0 or 1] Curves : Contrast adjustments using S-curves.
#define USE_SEPIA 1 //[0 or 1] Sepia : Sepia tones the image.
#define USE_DITHER 1 //[0 or 1] Dither : Applies dithering to simulate more colors than your monitor can display. This lessens banding artifacts (mostly caused by Vignette)
#define USE_TONEMAP 1 //[0 or 1] Tonemap : Adjust gamma, exposure, saturation, bleach and defog. (may cause clipping)
/*-----------------------------------------------------------.
/ SMAA Anti-aliasing settings /
'-----------------------------------------------------------*/
#define SMAA_THRESHOLD 0.05 //[0.05 to 0.20] Edge detection threshold. If SMAA misses some edges try lowering this slightly. I prefer between 0.08 and 0.12.
#define SMAA_MAX_SEARCH_STEPS 32 //[0 to 98] Determines the radius SMAA will search for aliased edges
#define SMAA_MAX_SEARCH_STEPS_DIAG 16 //[0 to 16] Determines the radius SMAA will search for diagonal aliased edges
#define SMAA_CORNER_ROUNDING 25 //[0 to 100] Determines the percent of antialiasing to apply to corners. 0 seems to affect fine text the least so it's the default.
// -- Advanced SMAA settings --
#define COLOR_EDGE_DETECTION 1 //[0 or 1] 1 Enables color edge detection (slower but slightly more acurate) - 0 uses luma edge detection (faster)
#define SMAA_DIRECTX9_LINEAR_BLEND 0 //[0 or 1] Using DX9 HARDWARE? (software version doesn't matter) if so this needs to be 1 - If not, leave it at 0.
//Enable this only if you use a Geforce 7xxx series or older card, or a Radeon X1xxx series or older card.
/*-----------------------------------------------------------.
/ Cartoon settings /
'-----------------------------------------------------------*/
#define CartoonPower 0.04 //[0.1 to 10.0] Amount of effect you want.
/*-----------------------------------------------------------.
/ HDR settings /
'-----------------------------------------------------------*/
#define HDRPower 0.96 //[0.00 to 8.00] Strangely lowering this makes the image brighter
#define radius2 0.78 //[0.00 to 8.00] Raising this seems to make the effect stronger and also brighter
/*-----------------------------------------------------------.
/ LumaSharpen settings /
'-----------------------------------------------------------*/
// -- Sharpening --
#define sharp_strength 0.63 //[0.10 to 3.00] Strength of the sharpening
#define sharp_clamp 0.070 //[0.000 to 1.000] Limits maximum amount of sharpening a pixel recieves - Default is 0.035
// -- Advanced sharpening settings --
#define pattern 2 //[1|2|3|4] Choose a sample pattern. 1 = Fast, 2 = Normal, 3 = Wider, 4 = Pyramid shaped.
#define offset_bias 1.15 //[0.0 to 6.0] Offset bias adjusts the radius of the sampling pattern.
//I designed the pattern for offset_bias 1.0, but feel free to experiment.
// -- Debug sharpening settings --
#define show_sharpen 0 //[0 or 1] Visualize the strength of the sharpen (multiplied by 4 to see it better)
/*-----------------------------------------------------------.
/ Monochrome settings /
'-----------------------------------------------------------*/
#define Monochrome_conversion_values float3(0.36,0.35,0.35) //[0.00 to 1.00] Percentage of RGB to include (should sum up to 1.00)
/*-----------------------------------------------------------.
/ Lift Gamma Gain settings /
'-----------------------------------------------------------*/
#define RGB_Lift float3(0.960, 0.955, 0.960) //[0.000 to 2.000] Adjust shadows for Red, Green and Blue
#define RGB_Gamma float3(1.003, 0.988, 0.993) //[0.000 to 2.000] Adjust midtones for Red, Green and Blue
#define RGB_Gain float3(0.995, 1.005, 1.010) //[0.000 to 2.000] Adjust highlights for Red, Green and Blue
/*-----------------------------------------------------------.
/ Curves settings /
'-----------------------------------------------------------*/
#define Curves_mode 0 //[0|1|2] Choose what to apply contrast to. 0 = Luma, 1 = Chroma, 2 = both Luma and Chroma. Default is 0 (Luma)
#define Curves_contrast 0.25 //[-1.00 to 1.00] The amount of contrast you want
// -- Advanced curve settings --
#define Curves_formula 2 //[1|2|3|4|5|6|7|8|9] The contrast s-curve you want to use.
//1 = Sine, 2 = Abs split, 3 = Smoothstep, 4 = Exp formula, 5 = Simplified Catmull-Rom (0,0,1,1), 6 = Perlins Smootherstep
//7 = Abs add, 8 = Techicolor Cinestyle, 9 = Parabola.
//Note that Technicolor Cinestyle is practically identical to Sine, but runs slower. In fact I think the difference might only be due to rounding errors.
//I prefer 2 myself, but 3 is a nice alternative with a little more effect (but harsher on the highlight and shadows) and it's the fastest formula.
/*-----------------------------------------------------------.
/ Sepia settings /
'-----------------------------------------------------------*/
#define ColorTone float3(1.40, 1.10, 0.90) //[0.00 to 2.55, 0.00 to 2.55, 0.00 to 2.55] What color to tint the image
#define GreyPower 0.21 //[0.00 to 1.00] How much desaturate the image before tinting it
#define SepiaPower 0.03 //[0.00 to 1.00] How much to tint the image
/*-----------------------------------------------------------.
/ Dither settings /
'-----------------------------------------------------------*/
#define dither_method 1 //[1 or 2] 1 = Ordering dithering (good and very fast), 2 = Random dithering (even better dithering but not as fast)
/*-----------------------------------------------------------.
/ Tonemap settings /
'-----------------------------------------------------------*/
#define Gamma 1.00 //[0.000 to 2.000] Adjust midtones
#define Exposure 0.02 //[-1.000 to 1.000] Adjust exposure
#define Saturation 0.00 //[-1.000 to 1.000] Adjust saturation
#define Bleach 0.00 //[0.000 to 1.000] Brightens the shadows and fades the colors
#define Defog 0.00 //[0.000 to 1.000] How much of the color tint to remove
#define FogColor float3(0.00, 0.00, 2.55) //[0.00 to 2.55, 0.00 to 2.55, 0.00 to 2.55] What color to remove - default is blue
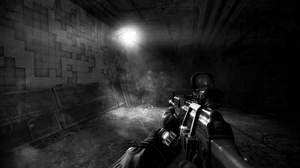
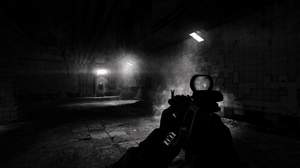
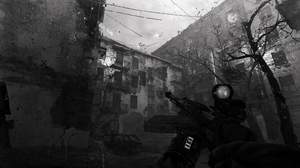
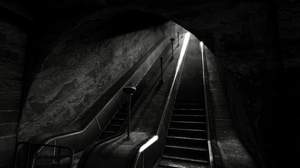
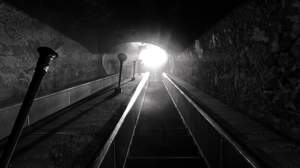
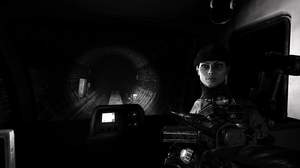
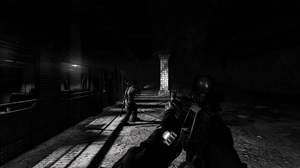
That's what I wrote in my description above ;) This one is more artbased. Of course you can play with it...but wasn't designed for it. I already did one for actual gameplay.
maybe, but in my opinion not for gaming :)
cuz it looks cool in many areas and it's great for making screenshots and wallpapers.
Why?