21 minutes ago
Photorealism & Cinematic Effects w/DoF
Preset description:
You can download my newest 2018 AC Origins overhaul Resahde: https://sfx.thelazy.net/games/preset/8847/
Patch Notes
- 1/9/2018 - Version 2.5 released. Drastically reduced overall softening effect. Press 5 and 7 on the numberpad to sharpen it much more (tip: disable GuassianBlur and have AdapativeShapren and Clarity on for a more crisp image overall). Fixed green tint. Messed with film grain some more. Lens Dirt enhancement. Other minor changes.
- 1/5/2018 - Version 2.4 released. Tons more changes to everything from Depth-of-field, to the color palette, shadows and lighting, shadow colors, film grain, sharpening and softening... everything basically! Also, got rid of the second film grain to simplify the download process. Please let me know if you have any issues or concerns. This is probably the last update to this ReShade since it's (finally) exactly what I intended to make when I first really got started. Cheers!
- 1/1/2018 - Version 2.3 released. More changes to soften image and make it more, well, photorealisitc. Please note the new grain type that needs to be downloaded and installed separately, per the CRITICAL INSTRUCTIONS section below. It's super easy and fast to do. If you find the image too dull, please enable the sharpening effects I've set up with 5 and 7 on the numberpad. I also changed bloom, the color is now white rather than blueish. Let me know if you want the blueish tone back and I'll tell you how.
Happy New Year!
- 12/31/2017 - Version 2.2 released. Tons of changes. Will detail more later, but in short, I softened the image, improved DoF, improved lighting and night brightness, and much more.
- 12/28/2017 - Version 2.1 released. Updated blur on Bayek. Fixed instructions to notify users to install GuassianBlur and TiltShift. Also updated controls for how to toggle those effects off.
- 12/28/2017 - Version 2.0 released. Completely rebuilt the ReShade from the ground up.
Merry Christmas/Happy Holidays and Happy New Years to all! Safe wishes to you and your families and friends this season.
- Merc
Video demos:
1) (newest) https://www.youtube.com/watch?v=hMd44-pOnwg&feature=youtu.be
2) https://www.youtube.com/watch?v=KUIYzNLqUMg
3) https://youtu.be/-vT5ApluLMY
4) https://www.youtube.com/watch?v=jnuRkYiy8HU
- Please like the vids, comment, and subscribe for support if you enjoy it. Thanks!
CRITICAL INSTRUCTIONS!!!!!!!
1) Once you've downloaded this, you MUST go to the in game Reshade "Settings" tab and make sure "RESHADE_DEPTH_INPUT_IS_REVERSED=1", make sure "RESHADE_DEPTH_INPUT_IS_LOGARITHMIC=1", AND make sure "RESHADE_DEPTH_LINEARIZATION_FAR_PLANE=10000.0" (without the quotes, of course) and then go back to the main "Home" reshade menu tab and click "reload" at the bottom of that reshade menu.
Failure to do this will render your entire screen 100% blurry while Depth-of-Field (DoF) is on.
2) After installing this reshade, you need to download this folder and copy-paste-overwrite the the files in the "reshade-shaders/textures" folder with the ones from this Dropbox download: https://www.dropbox.com/sh/zev64g410nac3dl/AABPmpjKviSTJtkGZo-BV42za?dl=0
3) If you finish the complete installation, including the steps in this Critical Instructions section, and things are still inexplicably and horribly blurry, it could be caused by TiltShift in some rare cases. Try disabling it. You can toggle it with 8 on the numberpad or in in-game reshade menu.
DESCRIPTION
This ReShade aims to bring a more realistic and yet cinematic tone to the already gorgeous Assassins Creed Origins. This preset includes a host of optional cinematic features, like Depth-of-Field (DoF), bloom, film grain, letterboxing, and more! In fact, I've set up toggle keys for all the major cinematic effects I've added. And they're remappable with the in-game ReShade menu.
Also, expect brighter and stronger light sources, darker nights and interiors, and shinier metals. Get it all here!
Please let me know if you have any questions, but there's extensive documentation below on all sorts of things from detailed installation instructions to tutorials on how to adjust certain settings to your liking. Constructive feedback is welcomed, and kind words of thanks are extremely appreciated!
Hope you like it!
- Merc (see the very end of the description to understand why I signed like that).
IMPORTANT THINGS TO NOTE:
All the DoF effects you see are from the ReShade's DOF, not the one that come with the game's photo mode. So this DoF is active whenever you're actually playing the game, not just in screenshots.
Bloom: Adjust fBloomThreshold or the fBloomAmount up or down in very small increments (of about 10 or 20) until you are happy with how much bloom you want. Increasing fBloomThreshold the value will give less bloom, while increasing fBloomAmount will give you more bloom.
DoF Quirks: To pull the DoF on far away out-of-focus areas closer to the player (and make it stronger), adjust DOF_FarBlurCurve up or down. Increasing the value will give less blur. To adjust blur on Bayek when looking at far away objects, adjust DOF_NearBLurCurve. Raising the value will lower the blur.
An oddity with AC Origins is that the ReShade's DoF can get deactivated by certain HUD/UI elements. I believe it most commonly is deactivated by the quest text in the upper left-hand corner. So if it sometimes cutting off is bothering you, I recommend either not tracking quests so the objective pops up on your screen and using the set way-point on the map feature instead OR switching the HUD preset in the game's "gameplay" menu option to minimal or off.
The ReShade DoF will also cut off when you're in photo mode and the screenshot overlay grid thing pops up as you're adjusting the image, but the DoF will come right back on once that goes away (just leave the camera steady for a couple secs and the grid disappears)
Brightness: If it is too dark lower the gamma setting in the in-game Reshade "Tonemap" setting in increments of 20. OR raise the "brightness" in the RehShade Technicolor 2 setting.
You may have to manually type it in certain values to adjust them. Just keep spam-clicking in the box until it gives you the typing cursor or use the .ini file.
CONTROLS
All of these are remappable once in game. (make sure numberpad is enabled or the controls won't work)
-Toggle ReShade menu on-off - Shift+F2.
-Toggle all ReShade effects - Scroll lock
-Toggle depth-of-field - / on numberpad
-Toggle sharpness - 5 on numberpad
-Toggle film grain - 3 on numberpad
-Black bars (letterbox) - 0 on numberpad
-Bloom and lens effects - 6 on numberpad
-Vignette (darkness around the corners) - * on numberpad
-Clarity (off by default) - 7 on numberpad
-Ambient Light (Controls certain lens-dirt effects) - . (Decimal point) on numberpad
-Toggle blur on Bayek (TitlShift) - 8 on numberpad
-Toggle GuassianBlur (applied to smoothen out image) - 9 on numberpad
I recommend opening the ReShade GUI's setting's menu and changing the following:
Toggle ReShade on and off with the END key
Toggle ReShade menu/gui with F4
INSTALLATION INSTRUCTIONS:
!!!IMPORTANT
For me the game crashes if I use any form of ReShade or SweetFx in fullscreen mode. So you must enable borderless window mode to use ReShade if yours also crashes when trying to load the game with Reshade enabled.
Tested at default in-game brightness. Use the in-game screen calibration setting to adjust your UI to fit into the letterbox (black bars).
Tested on Ultra settings.
IMPORTANT END!!!
Abridged Version of instructions:
Download latest version of ReShade from here: https://reshade.me/
Run the .exe in admin mode and select ACOrigins.exe in your Assassins Creed Origins main folder. (if installed to Steam's default location, can usually be found here: "... Steam\SteamApps\common\Assassins Creed Origins"
Choose the DirectX 10+ version
Say yes when it ask if you want to download a collection of shaders. Have these following shaders selected and deselect any of the effects not listed here:
AdaptiveSharpen
Border
Clarity
FakeHDR
Tonemap
Technicolor2
FilmGrain
DOF (depth of field)
Bloom
Vignette
LiftGammaGain
AmbientLight
TiltShift
GuassianBlur
Now download my preset here with the "download" button below. Rename that file "anythingyouwant.ini", the most important part is that the files name now ends ".ini" instead of ".txt" like it did when you downloaded it. Put that file in your game's main folder where you found ACOrigins.exe and where your reshade-shaders folder should now also be installed.
Run your game and after you get a message in a grey box saying reshade effects have loaded, press Shift+F2 simultaneously to open the in-game ReShade GUI. Select the .ini file from that drop down menu. Toggle the effect with scroll-lock key. You can change these keys in the ReShade's settings menu.
Click continue until the boxes go from red to gray/clear. Done. Your new ReShade should be making your game look fapping sexy by this point.
Step-by-Step Instructions:
1. Download the Reshade 3.0.8 (or latest version if different) from here https://reshade.me/
2. Scroll to bottom of page and download whatever the latest version advertised is.
Run the .exe that you just downloaded. Probably best to copy it to your desktop or somewhere first outside your downloads folder.
Follow the steps it tells you selecting yes everything it asks.
2. Select your "ACOrigins.exe" which is in the main folder of the game.
3. Select the DirectX 10+ version after you select the "ACOrigins.exe"
4. Run your game
As your game loads up, you should see a grey box popup in the top of the screen saying it's loading all the reshade effects.
Once it's done, hit "shift+F2" and follow the promps. The most important thing is to hit the plus symbol next near the top of the Reshade GUI and type any name you want.
Follow the other prompts until the boxes turn from red to black or grey or whatever indicates you're done with the very short tutorial.
You can leave your game open or close it for this next step.
5. Go back to your game's main folder, where the "ACOrigins.exe" is and look for that file you just created with whatever name you gave. It should be a .ini file.
6. Open the .ini file and replace all the text with the text from my preset on this page.
Save the file. Run your game or alt tab back to it. And then do step 7 if you your game is still running.
7. Reopen the Reshade GUI with Shift+f2 and click the click "reload". The new effects should start loading with my custom settings.
PROFIT!
UNINSTALLING
1. Delete the Reshade folder, dxgi.ini, dxgi.dll, and dxgi.log from your game folder. That's it.
Enjoy, leave comments below if you're having trouble installing or better yet youtube a Resahde 3.0+ install guide. It's extremely easy.
You may notice a slight decrease in performance, but it should still be pretty similar FPS to what you usually get. The visual difference is night and day to me and I can't ever go back to vanilla.
CONTACT
-- Please subscribe to my YouTube channel for lets plays and demos of my upcoming and released ReShades: https://www.youtube.com/channel/UCn5KAZuLeVmeQLXSMJNBMcA --
-- Please follow me on twitter: https://twitter.com/MercsAssassin --
MY MODS FOR OTHER GAMES
Exhaustive List Here, constantly updating it as I make new ReShades: https://www.facebook.com/MercsAssassin/
To save you a couple clicks, I try to keep the below list updated too:
ASSASSIN'S CREED ORIGINS
-- Cinematic Enhancer ReShade: https://rd.nexusmods.com/assassinscreedorigins/mods/1
-- White Hot Desert ReShade: https://sfx.thelazy.net/games/preset/8551/
-- Revelations ReShade: https://sfx.thelazy.net/games/preset/8550/
SKYRIM SPECIAL EDITION RESHADES
-- Live Action Trailer Graphics, The Dragonborn Comes, a ReShade for Vivid Weathers: http://www.nexusmods.com/skyrimspecialedition/mods/9990/?
-- Dovahkiin Rising ReShade for Dolomite Weathers: http://www.nexusmods.com/skyrimspecialedition/mods/9942?
-- Dragon Breaker ReShade, a Bright and Bold Look for Vivid Weathers: http://www.nexusmods.com/skyrimspecialedition/mods/9991/?
-- Skyrim SE Ashen ReShade: http://www.nexusmods.com/skyrimspecialedition/mods/9060/?tab=1&navtag=http%3A%2F%2Fwww.nexusmods.com%2Fskyrimspecialedition%2Fajax%2Fmoddescription%2F%3Fid%3D9060%26preview%3D&pUp=1 --
MASS EFFECT ANDROMEDA RESHADES
-- Cinematic Realism:
http://www.nexusmods.com/masseffectandromeda/mods/2/?tab=1&navtag=http%3A%2F%2Fwww.nexusmods.com%2Fmasseffectandromeda%2Fajax%2Fmoddescription%2F%3Fid%3D2%26preview%3D&pUp=1
-- Neon Bomb:
http://www.nexusmods.com/masseffectandromeda/mods/4? --
FALLOUT 4 RESHADES
-- Cinematic Realism: http://www.nexusmods.com/fallout4/mods/23442/?tab=1&navtag=http%3A%2F%2Fwww.nexusmods.com%2Ffallout4%2Fajax%2Fmoddescription%2F%3Fid%3D23442%26preview%3D&pUp=1 --
DIRT RALLY RESHADE
--
https://sfx.thelazy.net/games/preset/7323/
DIRT 4 RESHADES
-- Cinematic Racing Project: https://sfx.thelazy.net/games/preset/7333/
-- Cinematic Racing Project (Vibrant Version): https://sfx.thelazy.net/games/preset/7348/
MAD MAX ReShades
-- Cinematic Excellence: https://sfx.thelazy.net/games/preset/7434/
-- Cinematic Excellence (Bleak Version): https://sfx.thelazy.net/games/preset/7438/
GHOST RECON WILDLANDS RESHADES
-- Stunning Light & Atmospherics [newest ReShade] - https://sfx.thelazy.net/games/preset/7525/
-- Cinematic Excellence 2.0 ReShade (best neutral enhancer with lots of options) - http://www.nexusmods.com/ghostreconwildlands/mods/1/?
-- E3 2015 Graphics - more realistic, cold ReShade, inspired by E3 2015 trailers for the game with a more gray look - http://www.nexusmods.com/ghostreconwildlands/mods/2?
-- Borderlands-style Oil Painting ReShade - https://sfx.thelazy.net/games/preset/7175/
-- Uncharted-looking ReShade - https://sfx.thelazy.net/games/preset/7115/
-- Sun Soaked Graphics Overhaul - insane lighting amplifier. Sunsets, sunrise and clear days look nuts! - https://sfx.thelazy.net/games/preset/6992/
SQUAD ReShade
-- Cinematic Shooter Project: https://sfx.thelazy.net/games/preset/7474/
RAGE ReShade
-- Hit Me With Your Best Shot: https://sfx.thelazy.net/games/preset/7477/
ps: I'm TheMercsAssassin on most other websites, including youtube, twitter and the nexus. Hence, the Merc thing.
ps+: Do not use any part of my ReShade in your own work. Make your own through hard work and lots of time, like I did, please. Thanks.KeyLiftGammaGain=0,0,0,0
KeyClarity=103,0,0,0
KeyDeband=0,0,0,0
KeyGP65CJ042DOF=0,0,0,0
KeyDPX=0,0,0,0
KeyEmphasize=0,0,0,0
KeyLumaSharpen=0,0,0,0
KeyAmbientLight=110,0,0,0
KeyDaltonize=0,0,0,0
KeyNostalgia=0,0,0,0
KeyColorMatrix=0,0,0,0
KeyHSV_Tech=0,0,0,0
KeyTechnicolor2=0,0,0,0
KeyVibrance=0,0,0,0
KeyGaussianBlur=105,0,0,0
KeyHDR=0,0,0,0
KeyCartoon=0,0,0,0
KeyBorder=96,0,0,0
KeyTonemap=0,0,0,0
KeyMXAO=0,0,0,0
KeyFilmGrain2=0,0,0,0
KeyCreateLUT=0,0,0,0
KeyMatsoDOF=111,0,0,0
KeyFilmGrain=99,0,0,0
KeyLevels=0,0,0,0
KeyHighPassSharp=0,0,0,0
KeyVignette=106,0,0,0
KeyBloomAndLensFlares=102,0,0,0
KeyRingDOF=0,0,0,0
KeyAdaptiveSharpen=101,0,0,0
KeyMartyMcFlyDOF=100,0,0,0
KeyMagicDOF=0,0,0,0
KeyLUT=0,0,0,0
KeyMode3=0,0,0,0
KeyCA=0,0,0,0
KeyNonLocalMeans=0,0,0,0
KeyAdvancedCRT=0,0,0,0
KeyDisplayDepth=0,0,0,0
KeyKNearestNeighbors=0,0,0,0
KeyDepthHaze=0,0,0,0
KeyLeiFx_Tech=0,0,0,0
KeyEGAfilter=0,0,0,0
KeyCurves=0,0,0,0
KeyMotionBlur=0,0,0,0
KeyMode2=0,0,0,0
KeyMode1=0,0,0,0
KeyHQ4X=0,0,0,0
KeyFilmicPass=0,0,0,0
KeyAdaptiveFog=0,0,0,0
KeyLightDoF_AutoFocus=0,0,0,0
KeyFISHEYE_CA_VERTICAL=0,0,0,0
KeyLightDoF_Far=0,0,0,0
KeyASCII=0,0,0,0
KeyTechnicolor=0,0,0,0
KeyLightDoF_Near=0,0,0,0
KeyReflectiveBumpmapping=0,0,0,0
KeyMonochrome=0,0,0,0
KeyMultiLUT=0,0,0,0
KeyNightvision=0,0,0,0
KeyTiltShift=104,0,0,0
KeyTint=0,0,0,0
KeyMagicBloom=0,0,0,0
KeyColourfulness=0,0,0,0
KeyUIMask_Top=0,0,0,0
KeyUIMask_Bottom=0,0,0,0
KeySurfaceBlur=0,0,0,0
Techniques=LiftGammaGain,HDR,AmbientLight,Tonemap,Technicolor2,GaussianBlur,FilmGrain,Vignette,BloomAndLensFlares,TiltShift,MatsoDOF,Border
TechniqueSorting=MagicBloom,MotionBlur,LiftGammaGain,Emphasize,Daltonize,HDR,ColorMatrix,HSV_Tech,AmbientLight,Tonemap,Technicolor2,GaussianBlur,Vibrance,AdaptiveSharpen,FilmGrain,Clarity,MartyMcFlyDOF,Vignette,BloomAndLensFlares,MXAO,TiltShift,RingDOF,MagicDOF,MatsoDOF,GanossaMotionFocus,Border,LUT,CreateLUT,DisplayDepth,Levels,DPX,CA,GP65CJ042DOF,Deband,NonLocalMeans,LeiFx_Tech,AdvancedCRT,FilmGrain2,Mode2,Mode3,Curves,HighPassSharp,KNearestNeighbors,EGAfilter,HQ4X,DepthHaze,Mode1,ASCII,AdaptiveFog,LumaSharpen,FilmicPass,LightDoF_Far,LightDoF_AutoFocus,LightDoF_Near,Nostalgia,Tint,MultiLUT,ReflectiveBumpmapping,Monochrome,Technicolor,Cartoon,Nightvision,Colourfulness,UIMask_Top,UIMask_Bottom,SurfaceBlur,Grain_Tech,FISHEYE_CA_HORIZONTAL,FISHEYE_CA_VERTICAL
KeyGanossaMotionFocus=0,0,0,0
KeyGrain_Tech=0,0,0,0
KeyFISHEYE_CA_HORIZONTAL=0,0,0,0
[CRT.fx]
Resolution=2.540000
Curvature=0.000000
Gamma=2.400000
Brightness=1.530000
MonitorGamma=2.160000
ScanlineIntensity=2.000000
CornerSize=0.010000
ScanlineGaussian=1.000000
CurvatureRadius=1.500000
ViewerDistance=2.000000
Angle=0.000000,0.000000
Overscan=1.010000
Oversample=-1.000000
[Bloom.fx]
bGodrayEnable=0.000000
iBloomMixmode=1.000000
fBloomSaturation=0.000000
bAnamFlareEnable=0.000000
fBloomThreshold=0.703000
fBloomAmount=0.400000
fLensdirtSaturation=2.000000
fBloomTint=0.317647,0.313726,0.317647
fLensdirtIntensity=1.500000
bLensdirtEnable=-1.000000
fFlareLuminance=0.000000
iLensdirtMixmode=1.000000
fLensdirtTint=1.000000,1.000000,1.000000
bLenzEnable=0.000000
fAnamFlareThreshold=0.901000
fAnamFlareWideness=1.000000
fAnamFlareAmount=20.000000
fAnamFlareCurve=2.000000
fAnamFlareColor=0.274510,0.274510,0.274510
fLenzIntensity=1.000000
fLenzThreshold=0.800000
bChapFlareEnable=0.000000
fChapFlareTreshold=0.900000
iChapFlareCount=15.000000
fChapFlareDispersal=0.250000
fChapFlareSize=0.450000
fFlareIntensity=1.976000
fChapFlareCA=0.000000,0.010000,0.020000
fChapFlareIntensity=5.000000
fGodrayDecay=1.000000
fGodrayExposure=0.700000
fGodrayWeight=1.700000
fGodrayDensity=1.622000
fGodrayThreshold=0.968000
iGodraySamples=70.000000
fFlareBlur=200.980011
fFlareTint=0.000000,0.000000,0.000000
[3DFX.fx]
DITHERAMOUNT=0.500000
LEIFX_PIXELWIDTH=1.500000
DITHERBIAS=-1.000000
LEIFX_LINES=1.000000
GAMMA_LEVEL=1.000000
[AmbientLight.fx]
alAdaptBaseMult=1.000000
alDebug=0.000000
AL_DirtTex=0.000000
alInt=3.000000
alThreshold=1.000000
AL_Adaptation=-1.000000
AL_Dirt=0.000000
alAdapt=1.360000
alLensThresh=0.300000
alAdaptBaseBlackLvL=3.000000
AL_Vibrance=0.000000
AL_Adaptive=2.000000
alDirtInt=1.160000
alLensInt=3.300000
alDirtOVInt=1.000000
AL_Lens=-1.000000
[AdaptiveFog.fx]
FogCurve=1.500000
FogColor=0.900000,0.900000,0.900000
MaxFogFactor=0.800000
BloomPower=10.000000
FogStart=0.050000
BloomThreshold=10.250000
BloomWidth=0.200000
[HQ4X.fx]
k=-1.100000
s=1.500000
mx=1.000000
max_w=0.750000
lum_add=0.330000
min_w=0.030000
[AdaptiveSharpen.fx]
D_compr_low=0.010000
L_compr_low=0.169000
curve_height=0.750000
curveslope=0.400000
D_overshoot=0.009000
L_overshoot=0.010000
D_compr_high=0.500000
L_compr_high=0.300000
scale_lim=0.100000
scale_cs=0.560000
pm_p=0.750000
[ASCII.fx]
Ascii_font_g=255.000000
Ascii_spacing=0.000000
Ascii_back_g=0.000000
Ascii_font=1.000000
Ascii_font_b=255.000000
Ascii_font_r=255.000000
Ascii_back_b=0.000000
Ascii_back_r=0.000000
Ascii_swap_colors=0.000000
Ascii_invert_brightness=0.000000
Ascii_dithering_temporal=0.000000
Ascii_font_color_mode=1.000000
[Border.fx]
border_width=0.000000,130.000000
border_ratio=2.350000
border_color=0.000000,0.000000,0.000000
[Sepia.fx]
Tint=0.550000,0.430000,0.420000
Strength=0.580000
[Cartoon.fx]
Power=2.476000
EdgeSlope=0.631000
[FilmicPass.fx]
Linearization=0.500000
Strength=0.850000
Contrast=1.000000
Fade=0.400000
Bleach=0.000000
Saturation=-0.150000
GreenCurve=1.000000
RedCurve=1.000000
BlueCurve=1.000000
BaseCurve=1.500000
BaseGamma=1.000000
EffectGamma=0.650000
EffectGammaR=1.000000
EffectGammaG=1.000000
EffectGammaB=1.000000
LumCoeff=0.212656,0.715158,0.072186
[ChromaticAberration.fx]
Shift=0.000000,3.000000
Strength=0.500000
[Clarity.fx]
ClarityBlendMode=5.000000
ClarityRadius=2.000000
ClarityOffset=2.000000
ClarityDarkIntensity=0.000000
ClarityBlendIfDark=50.000000
ClarityBlendIfLight=205.000000
ClarityStrength=0.200000
ClarityViewBlendIfMask=0.000000
ClarityLightIntensity=0.000000
ClarityViewMask=0.000000
[ColorMatrix.fx]
ColorMatrix_Red=0.680000,0.000000,0.000000
ColorMatrix_Green=0.000000,0.800000,0.000000
ColorMatrix_Blue=0.200000,0.010000,0.700000
Strength=1.000000
[MultiLUT.fx]
fLUT_LutSelector=0.000000
fLUT_AmountChroma=1.000000
fLUT_AmountLuma=1.000000
[Colourfulness.fx]
lim_luma=0.700000
colourfulness=0.400000
[CreateLUT.fx]
X_Position=0.000000
Y_Position=0.000000
[SurfaceBlur.fx]
BlurRadius=1.000000
DebugMode=0.000000
BlurOffset=0.110000
BlurEdge=10.000000
BlurStrength=3.000000
[Curves.fx]
Mode=0.000000
Formula=4.000000
Contrast=0.650000
[UIMask.fx]
fMask_Intensity=1.000000
bDisplayMask=0.000000
[Daltonize.fx]
Type=1.000000
[Deband.fx]
Threshold=0.004000
Range=16.000000
Iterations=4.000000
Grain=0.000000
[Denoise.fx]
LerpCoefficeint=0.800000
NoiseLevel=0.150000
WeightThreshold=0.030000
CounterThreshold=0.050000
GaussianSigma=50.000000
[DepthHaze.fx]
FogStart=0.200000
EffectStrength=0.960000
FogColor=0.800000,0.800000,0.800000
FogFactor=0.860000
[FisheyeVertical.fx]
fFisheyeZoom=0.500000
fFisheyeDistortionCubic=0.700000
fFisheyeDistortion=0.010000
fFisheyeColorshift=0.002000
[DOF.fx]
DOF_FARBLURCURVE=2.423000
fADOF_ShapeCurvatureAmount=1.000000
DOF_AUTOFOCUS=-1.000000
DOF_MOUSEDRIVEN_AF=0.000000
fGPDOFChromaAmount=0.000000
DOF_INFINITEFOCUS=0.105000
fGPDOFBiasCurve=1.230000
DOF_FOCUSPOINT=0.700000,0.550000
bADOF_ShapeApertureEnable=0.000000
DOF_FOCUSSAMPLES=10.000000
DOF_MANUALFOCUSDEPTH=0.015000
DOF_NEARBLURCURVE=1000.000061
fGPDOFBrightnessMultiplier=1.540000
bGPDOFPolygonalBokeh=0.000000
fRingDOFFringe=0.000000
DOF_FOCUSRADIUS=0.001000
DOF_BLURRADIUS=7.000000
fADOF_BokehCurve=19.050001
iRingDOFSamples=30.000000
iRingDOFRings=8.000000
fGPDOFBrightnessThreshold=1.070000
fRingDOFThreshold=2.650000
bADOF_ShapeCurvatureEnable=-1.000000
fRingDOFGain=16.246000
fRingDOFBias=0.000000
bADOF_ImageChromaEnable=0.000000
iMagicDOFBlurQuality=8.000000
fMagicDOFColorCurve=4.240000
iGPDOFQuality=7.000000
fADOF_ShapeChromaAmount=0.125000
fADOF_ShapeRotation=0.000000
iGPDOFPolygonCount=5.000000
fGPDOFBias=-0.200000
fADOF_SmootheningAmount=0.000000
bMatsoDOFChromaEnable=0.000000
fMatsoDOFChromaPow=1.712000
fMatsoDOFBokehCurve=4.400000
iADOF_ShapeQuality=39.000000
iMatsoDOFBokehQuality=5.000000
fMatsoDOFBokehAngle=0.000000
bADOF_RotAnimationEnable=0.000000
fADOF_RotAnimationSpeed=5.000000
fADOF_ShapeWeightAmount=0.500000
fADOF_ShapeApertureAmount=1.000000
bADOF_ShapeAnamorphEnable=0.000000
fADOF_ShapeAnamorphRatio=0.050000
bADOF_ShapeDistortEnable=0.000000
bADOF_ShapeChromaEnable=0.000000
fADOF_ShapeWeightCurve=0.500000
fADOF_ShapeDistortAmount=0.200000
bADOF_ShapeDiffusionEnable=0.000000
fADOF_ShapeDiffusionAmount=1.000000
bADOF_ShapeWeightEnable=0.000000
iADOF_ImageChromaHues=20.000000
iADOF_ShapeChromaMode=3.000000
fADOF_ImageChromaCurve=1.985000
fADOF_ImageChromaAmount=3.273000
[Vignette.fx]
Type=0.000000
Center=0.500000,0.500000
Ratio=2.229000
Radius=1.480000
Amount=-1.610000
Slope=6.000000
[DPX.fx]
Strength=0.500000
RGB_Curve=15.000001,8.000000,8.000000
RGB_C=0.360000,0.360000,0.340000
Contrast=0.000000
Saturation=1.040000
Colorfulness=2.020000
[Emphasize.fx]
ManualFocusDepth=0.020000
FocusRangeDepth=0.050000
EffectFactor=0.500000
BlendColor=0.000000,0.000000,0.000000
FocusEdgeDepth=0.500000
BlendFactor=0.300000
[FakeHDR.fx]
HDRPower=1.300000
radius1=1.033000
radius2=1.030000
[MagicBloom.fx]
f2Adapt_Clip=0.000000,1.000000
fBloom_Intensity=0.717000
fBloom_Threshold=1.300000
fDirt_Intensity=0.000000
fExposure=0.815000
fAdapt_Sensitivity=0.500000
fAdapt_Speed=0.100000
iDebug=0.000000
iAdapt_Precision=2.000000
[FineSharp.fx]
cstr=0.900000
sstr=2.000000
pstr=1.272000
xstr=0.190000
lstr=1.490000
xrep=0.250000
[FakeMotionBlur.fx]
mbRecall=0.300000
mbSoftness=0.200000
[FilmGrain.fx]
Intensity=0.510000
Variance=0.200000
Mean=0.500000
SignalToNoiseRatio=1.000000
[FilmGrain2.fx]
grainamount=0.048000
coloramount=0.600000
lumamount=1.000000
grainsize=1.600000
[GaussianBlur.fx]
GaussianBlurRadius=1.000000
GaussianBlurOffset=0.400000
GaussianBlurStrength=0.400000
[HighPassSharpen.fx]
HighPassSharpRadius=1.000000
HighPassViewBlendIfMask=0.000000
HighPassSharpOffset=1.000000
HighPassBlendMode=1.000000
HighPassBlendIfLight=255.000000
HighPassBlendIfDark=0.000000
HighPassLightIntensity=1.000000
HighPassDarkIntensity=1.000000
HighPassSharpStrength=0.400000
HighPassViewSharpMask=0.000000
[HSV.fx]
fColorHueMult=1.000000
fSaturationModCyan=0.300000
fColorSaturationMod=-0.000000
fColorSaturationPow=1.000000
fColorSaturationMult=1.000000
fSaturationMultYellow=0.000000
fColorIntensityMod=-0.000000
fColorIntensityMult=1.000000
fColorIntensityPow=1.000000
fColorHueMod=-0.000000
fColorHuePow=1.000000
fSaturationModGreen=0.000000
fSaturationModRed=0.300000
fSaturationModOrange=0.000000
fSaturationModYellow=0.000000
fSaturationModBlue=0.300000
fSaturationModMagenta=0.000000
fSaturationMultRed=0.000000
fSaturationMultOrange=0.000000
fSaturationMultGreen=0.000000
fSaturationMultCyan=0.000000
fSaturationMultBlue=0.000000
fSaturationMultMagenta=0.000000
fSaturationPowRed=-0.340000
fSaturationPowOrange=-0.000000
fSaturationPowYellow=0.000000
fSaturationPowGreen=0.000000
fSaturationPowCyan=0.360000
fSaturationPowBlue=0.200000
fSaturationPowMagenta=0.000000
[ReflectiveBumpMapping.fx]
iRBM_SampleCount=32.000000
fRBM_LowerThreshold=0.100000
fRBM_BlurWidthPixels=100.000000
fRBM_ColorMask_Orange=1.000000
fRBM_ReliefHeight=0.300000
fRBM_FresnelMult=0.500000
fRBM_FresnelReflectance=0.300000
fRBM_UpperThreshold=0.200000
fRBM_ColorMask_Red=1.000000
fRBM_ColorMask_Yellow=1.000000
fRBM_ColorMask_Green=1.000000
fRBM_ColorMask_Cyan=1.000000
fRBM_ColorMask_Blue=1.000000
fRBM_ColorMask_Magenta=1.000000
[LUT.fx]
fLUT_AmountChroma=0.000000
fLUT_AmountLuma=0.000000
[Levels.fx]
BlackPoint=10.000000
WhitePoint=255.000000
HighlightClipping=0.000000
[TiltShift.fx]
BlurMultiplier=4.000000
Line=0.000000
Axis=0.000000
Offset=-0.800000
BlurCurve=2.300000
[LiftGammaGain.fx]
RGB_Lift=1.200000,1.200000,1.180000
RGB_Gamma=1.100000,1.100000,1.100000
RGB_Gain=0.900000,0.900000,0.900000
[MXAO.fx]
bMXAOSmoothNormalsEnable=0.000000
fMXAOAmbientOcclusionAmount=0.420000
fMXAONormalBias=0.400000
fMXAOFadeoutStart=0.200000
iMXAOBayerDitherLevel=3.000000
fMXAOIndirectLightingAmount=4.080000
iMXAOSampleCount=25.000000
fMXAOIndirectLightingSaturation=1.020000
fMXAOSampleRadius=4.570000
fMXAOBlurSharpness=2.000000
fMXAOBlurSteps=2.000000
bMXAODebugViewEnable=0.000000
fMXAOFadeoutEnd=0.400000
[LightDoF.fx]
fLightDoF_Width=6.040000
f2LightDoF_CA=0.000000,0.000000
f2Bokeh_AutoFocusCenter=0.700000,0.400000
fLightDoF_Amount=0.400000
bLightDoF_UseCA=0.000000
bLightDoF_AutoFocus=-1.000000
fLightDoF_ManualFocus=0.000000
bLightDoF_UseMouseFocus=0.000000
fLightDoF_AutoFocusSpeed=0.101000
[FilmGrain3.fx]
GrainLuma=0.800000
GrainSize=2.000000
GrainPower=0.020000
GrainColorAmount=0.150000
[LumaSharpen.fx]
pattern=1.000000
sharp_strength=0.650000
sharp_clamp=0.035000
offset_bias=1.000000
show_sharpen=0.000000
[Monochrome.fx]
Coefficients=0.210000,0.720000,0.070000
ColorSaturation=0.000000
[Technicolor2.fx]
Saturation=0.300000
ColorStrength=0.784314,0.486275,1.000000
Brightness=0.860000
Strength=0.500000
[Technicolor.fx]
Power=7.280000
RGBNegativeAmount=0.392157,1.000000,10.058824
Strength=0.500000
[Tonemap.fx]
Defog=0.020000
Bleach=0.370000
Gamma=0.900000
Exposure=0.140000
Saturation=0.700000
FogColor=1.960784,0.996078,0.686275
[Vibrance.fx]
Vibrance=0.300000
VibranceRGBBalance=-0.000000,-0.000000,-0.200000
[MotionFocus.fx]
mfDebug=0.000000
mfFocusStrength=0.000100
mfZoomStrength=0.000100
[FisheyeHorizontal.fx]
fFisheyeZoom=0.515000
fFisheyeDistortionCubic=0.700000
fFisheyeDistortion=-0.090000
fFisheyeColorshift=0.008000
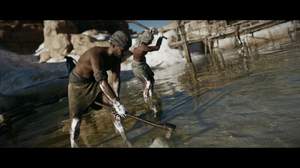
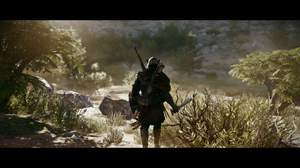
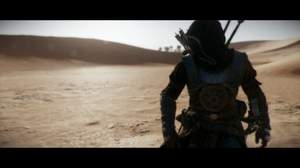
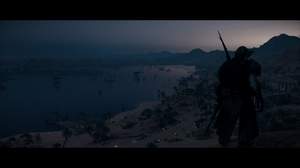
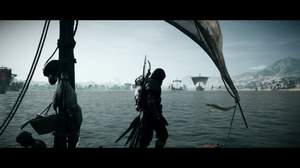
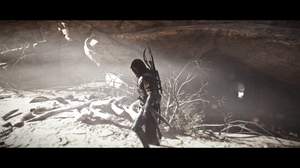
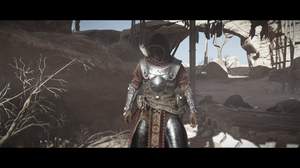
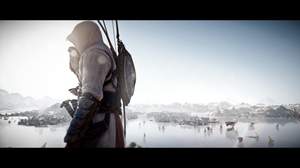
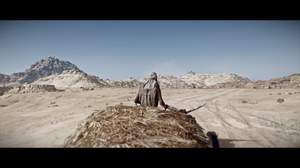
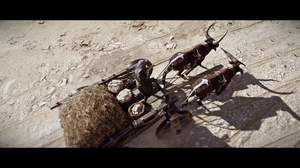
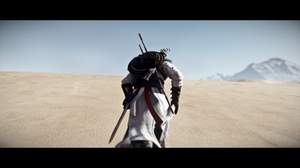
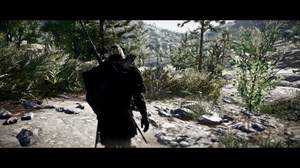
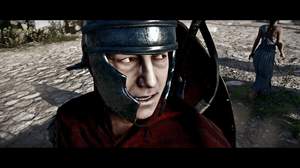
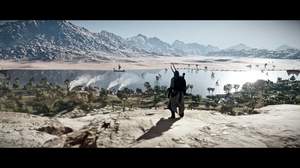
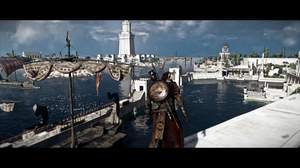
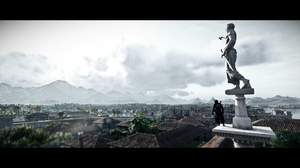
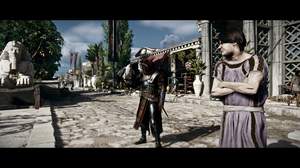
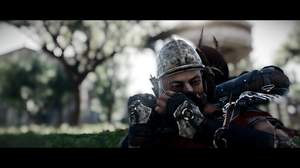
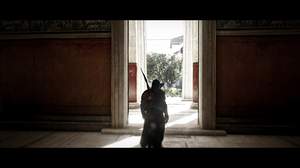
Being new to reshaders; I am blown away by this effect !! Hope that something like this could be done for Witcher 3 ? Any pointers in general for shaders and how to achieve this effect, without copying it, as the modder requests below...
Thanks Jules